Alright folks, listen up! If you’ve been scratching your head wondering how to do box stitch lanyard, you’re in the right place. Lanyards are not just accessories; they’re functional tools that keep our keys, IDs, and other essentials close at hand. And if you’re into crafting or just want to personalize your own lanyard, box stitch is the way to go. Let’s dive in!
Box stitch lanyards are super cool because they’re sturdy, stylish, and easy to make once you get the hang of it. Whether you’re making one for yourself, as a gift, or even for a business, mastering the art of box stitching can open up a world of possibilities. So, grab your materials and let’s get started on this crafting adventure!
Now, before we jump into the nitty-gritty, let’s set the stage. This guide is packed with tips, tricks, and all the info you need to create a box stitch lanyard that’ll blow your mind. And hey, don’t worry if you’re a beginner—this guide is tailored to make things crystal clear. Let’s go!
What is a Box Stitch Lanyard?
First things first, let’s talk about what exactly a box stitch lanyard is. Simply put, it’s a lanyard made using the box stitch technique. The box stitch gives the lanyard a neat, professional look, and it’s incredibly durable. This method involves weaving strands of material together in a specific pattern, creating a strong and stylish final product.
Box stitch lanyards are popular for a reason. They’re versatile, easy to customize, and perfect for anyone who wants a touch of personalization in their everyday items. Plus, they’re surprisingly simple to make once you’ve got the basics down.
Why Choose Box Stitch for Your Lanyard?
Here’s the deal: box stitch isn’t just another fancy technique. It’s got some serious advantages that make it stand out from the crowd. For starters, it’s super strong. The interlocking pattern of the stitches ensures that your lanyard won’t fall apart anytime soon. Secondly, it looks amazing. The clean lines and structured design give your lanyard a polished appearance that’s hard to beat.
And let’s not forget the customization factor. With box stitch, you can play around with different colors, materials, and patterns to create something truly unique. Whether you’re crafting for fun or for business, this technique offers endless possibilities.
Materials You’ll Need
Before you dive into the crafting process, you’ll need to gather your materials. Here’s a quick rundown of what you’ll need to get started:
- Paracord or lanyard cord (your choice of color)
- A metal ring or clip (for attaching your ID or key)
- A pair of scissors
- A lanyard hook (optional, but recommended)
- A ruler or measuring tape
Pro tip: Choose high-quality materials to ensure your lanyard lasts as long as possible. Trust me, you don’t want to skimp on quality when it comes to something you’ll use every day.
Step-by-Step Guide to Box Stitch Lanyard
Step 1: Measure and Cut Your Cord
The first step in creating your box stitch lanyard is to measure and cut your cord. For a standard lanyard, you’ll need about 8-10 feet of cord. This might seem like a lot, but trust me, you’ll need it to create the intricate box stitch pattern.
Once you’ve measured your cord, use your scissors to make a clean cut. Don’t worry if it’s not perfect—just try to keep it as straight as possible.
Step 2: Create the Starting Loop
Now that you’ve got your cord, it’s time to create the starting loop. Fold the cord in half and secure the folded end with your metal ring or clip. This will serve as the anchor point for your lanyard.
If you’re using a lanyard hook, attach it to the metal ring now. This will make it easier to attach your ID or key later on.
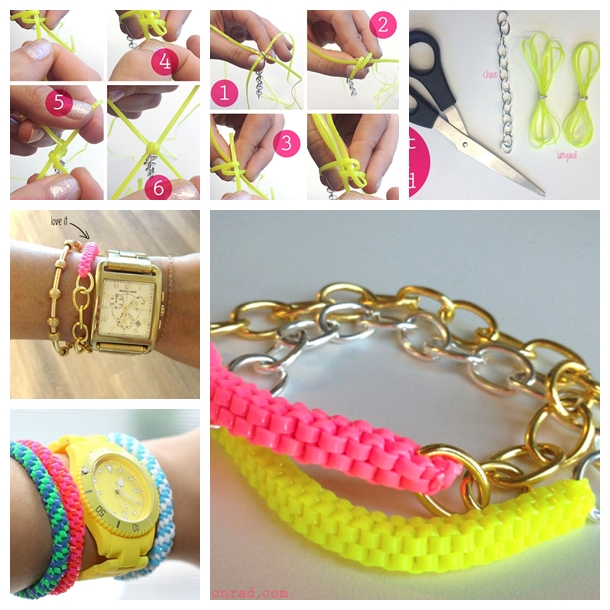
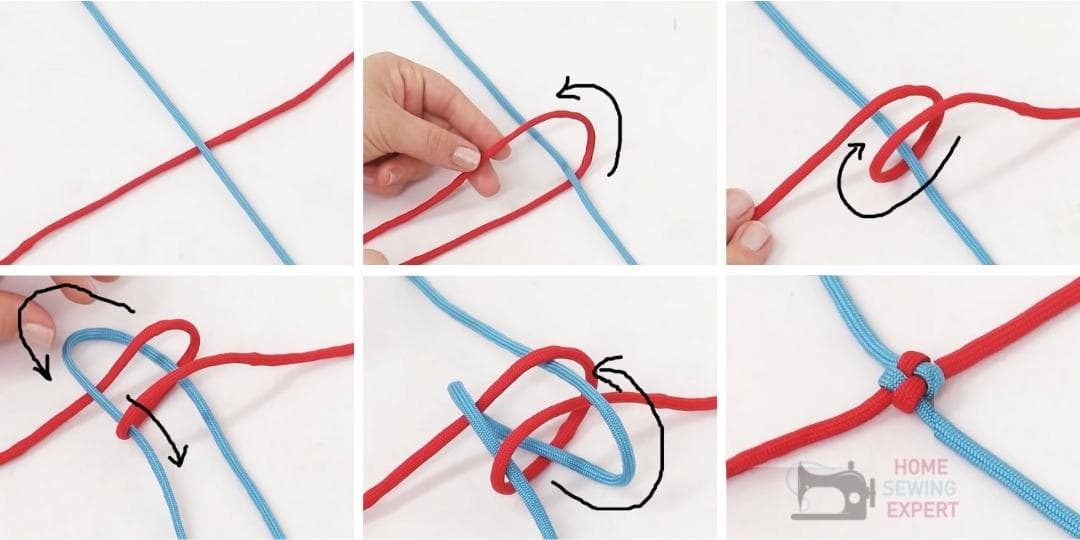
Step 3: Begin the Box Stitch Pattern
This is where the magic happens! To start the box stitch pattern, take one end of the cord and loop it over the other end. Then, take the other end and loop it under the first loop. Pull both ends tight to secure the stitch.
Repeat this process, alternating which end goes over and under, to create the box stitch pattern. It might feel a little awkward at first, but you’ll get the hang of it in no time.
Step 4: Continue Stitching
Keep going with the box stitch pattern until your lanyard reaches the desired length. Remember to pull each stitch tight to ensure a strong, even pattern. If you’re worried about the length, measure as you go to make sure you’re on track.
And don’t forget to have fun! Crafting should be enjoyable, so take your time and enjoy the process.
Step 5: Finish the Lanyard
Once your lanyard is the right length, it’s time to finish it off. Take the remaining cord and tie a knot at the end to secure the stitches. Trim any excess cord with your scissors, leaving a small tail for added strength.
And there you have it—your very own box stitch lanyard! Now, wasn’t that easy?
Tips for Perfecting Your Box Stitch Lanyard
While the basics of box stitch are straightforward, there are a few tips and tricks that can help you take your lanyard game to the next level. Here are some pointers to keep in mind:
- Practice makes perfect. If your first attempt doesn’t turn out exactly as you hoped, don’t get discouraged. Keep practicing and you’ll improve in no time.
- Experiment with different colors and patterns. The beauty of box stitch is that you can mix and match to create something truly unique.
- Use high-quality materials. As I mentioned earlier, quality matters. Investing in good materials will ensure your lanyard lasts longer and looks better.
- Measure twice, cut once. This old adage holds true in crafting. Always double-check your measurements before cutting your cord.
By following these tips, you’ll be well on your way to crafting the perfect box stitch lanyard.
Common Mistakes to Avoid
Even the best crafters make mistakes from time to time. Here are a few common pitfalls to watch out for when making your box stitch lanyard:
- Not pulling stitches tight enough. Loose stitches can lead to a weak lanyard that’s prone to breaking.
- Using low-quality materials. Cheap materials might save you money upfront, but they’ll cost you in the long run when your lanyard falls apart.
- Not measuring properly. A lanyard that’s too short or too long won’t be as functional or stylish.
By being aware of these common mistakes, you can avoid them and create a lanyard that’s both beautiful and functional.
How to Customize Your Box Stitch Lanyard
One of the best things about box stitch lanyards is the endless customization options. Here are a few ideas to get you started:
- Add beads or charms to your lanyard for a touch of personality.
- Experiment with different colors to create a unique pattern.
- Use different types of cord, such as leather or nylon, for a different texture.
The possibilities are truly endless when it comes to customizing your box stitch lanyard. Let your creativity run wild and see what you can come up with!
Benefits of Making Your Own Box Stitch Lanyard
There are plenty of reasons to make your own box stitch lanyard. For starters, it’s a great way to express your creativity and personal style. Plus, it’s a fun and rewarding hobby that can help you unwind after a long day.
And let’s not forget the cost savings. While store-bought lanyards can be pricey, making your own is surprisingly affordable. With just a few basic materials, you can create a lanyard that’s just as good—if not better—than anything you’d buy in a store.
Conclusion: Take Action and Start Crafting
Well, there you have it—everything you need to know about how to do box stitch lanyard. From gathering your materials to perfecting your technique, this guide has walked you through every step of the process. Now it’s your turn to take action and start crafting!
So, what are you waiting for? Grab your materials, find a cozy spot, and get started on your very own box stitch lanyard. And when you’re done, don’t forget to share your masterpiece with the world. Whether it’s on social media or with friends and family, showing off your hard work is half the fun.
And if you’ve got any questions or tips of your own, leave a comment below. I’d love to hear from you and see what you’ve created. Happy crafting, folks!
Table of Contents
- What is a Box Stitch Lanyard?
- Why Choose Box Stitch for Your Lanyard?
- Materials You’ll Need
- Step-by-Step Guide to Box Stitch Lanyard
- Tips for Perfecting Your Box Stitch Lanyard
- Common Mistakes to Avoid
- How to Customize Your Box Stitch Lanyard
- Benefits of Making Your Own Box Stitch Lanyard
- Conclusion: Take Action and Start Crafting