Printing screens on your Surface Pro can seem tricky at first, but don’t sweat it! In today’s digital world, capturing what’s on your screen is more important than ever. Whether you’re troubleshooting an issue, sharing instructions, or just saving a cool moment, knowing how to print screen on a Surface Pro is a must-have skill. So buckle up, and let’s dive into this step-by-step guide!
Let’s face it, figuring out how to print screen on a Surface Pro isn’t always straightforward. Unlike desktops or older laptops, Surface Pros come with their own quirks and shortcuts that can leave even tech-savvy users scratching their heads. But fear not, my friend! This guide will walk you through everything you need to know, from the basics to some advanced tips.
Before we get into the nitty-gritty, here’s the good news: taking screenshots on a Surface Pro is actually pretty simple once you know the tricks. Whether you’re using Windows 11 or Windows 10, we’ve got you covered. Let’s make sure you never miss a screen capture again!
Why Mastering Print Screen on Surface Pro Matters
Have you ever tried explaining a problem to someone over the phone? It can be frustrating, right? That’s where print screen comes in. Instead of fumbling with words, you can simply capture what’s on your screen and send it over. But why does mastering this skill matter so much for Surface Pro users?
First off, Surface Pros are versatile devices. They’re not just laptops—they’re tablets too! This dual functionality means there are multiple ways to capture your screen, depending on what you’re doing at the moment. Plus, with Windows updates constantly rolling out, it’s essential to stay updated on the latest shortcuts and tools.
Finally, being able to print screen effectively can save you time and effort. Whether you’re creating tutorials, documenting issues, or just saving a funny meme, having this skill in your pocket is invaluable.
Common Misconceptions About Print Screen
Let’s clear up some common myths about print screen on Surface Pro. A lot of people think it’s complicated or that they need fancy software to do it. WRONG! Most of the time, all you need is a simple keyboard shortcut or two.
- Myth #1: You need third-party apps to capture screens. Nope! Windows has built-in tools that work just fine.
- Myth #2: Print screen only works for full-screen captures. Wrong again! You can capture specific windows, parts of the screen, or even annotate them.
- Myth #3: It’s hard to save screenshots. Actually, saving screenshots is super easy if you know where to look.
Now that we’ve busted those myths, let’s move on to the real deal!
How to Print Screen on a Surface Pro: Step-by-Step
Taking a screenshot on a Surface Pro is easier than you think. Follow these steps, and you’ll be a pro in no time.
Method 1: Using the Keyboard Shortcut
One of the fastest ways to take a screenshot on a Surface Pro is by using the keyboard shortcut. Here’s how:
- Press the
Windowskey +Print Screenbutton simultaneously. - Your screen will dim slightly, and the screenshot will automatically be saved to your
Picturesfolder underScreenshots. - Voila! You’re done.
This method is great for quick captures, but what if you want more control? Keep reading!
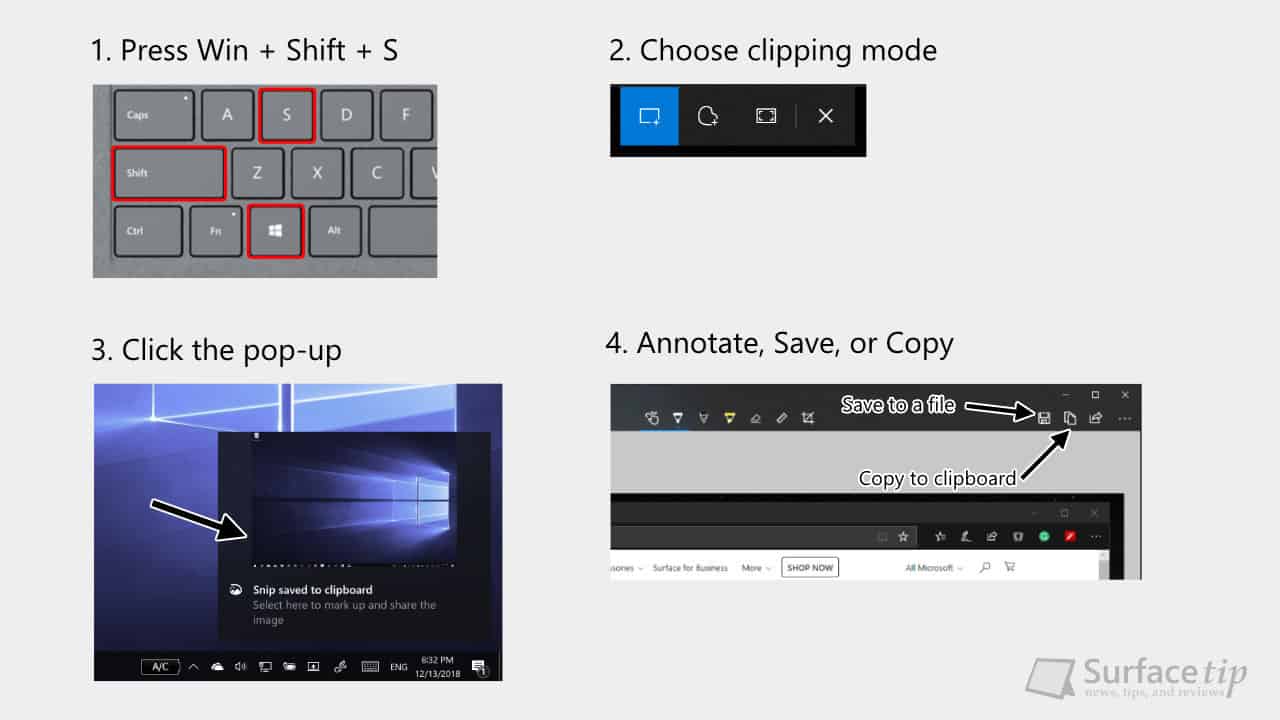
Method 2: Using Snip & Sketch
Snip & Sketch is one of the most powerful tools for taking screenshots on a Surface Pro. Here’s how to use it:
- Press the
Windowskey +Shift+S. - A toolbar will appear, allowing you to choose between different capture modes:
- Rectangular Snip
- Freeform Snip
- Window Snip
- Full-screen Snip
- Select your preferred mode and capture the area you want.
- The screenshot will be copied to your clipboard, ready to paste wherever you need it.
Snip & Sketch is perfect for when you need precision or want to annotate your screenshots.
Advanced Tips for Print Screen Mastery
Once you’ve mastered the basics, it’s time to level up your screenshot game. Here are some advanced tips to make your life easier:
Tip #1: Use Game Bar for Quick Captures
Did you know you can use the Game Bar to take screenshots? It’s not just for gamers!
- Press
Windows+Gto open the Game Bar. - Click the camera icon or press
Windows+Alt+Print Screento capture your screen. - Your screenshot will be saved in the
Videosfolder underCaptures.
Tip #2: Customize Your Shortcut Keys
Don’t like the default shortcuts? No problem! You can customize them to suit your workflow.
- Go to
Settings>System>Keyboard. - Scroll down to
Customize your shortcut keys. - Create your own shortcuts for frequently used actions.
Tip #3: Use Third-Party Apps for Extra Features
While Windows has plenty of built-in tools, sometimes you need a little extra firepower. Apps like Greenshot or Lightshot offer advanced features like auto-upload and cloud storage.
Just remember, these apps are optional. Stick with the built-in tools unless you have a specific need.
Troubleshooting Common Issues
Even the best tools can have hiccups. Here’s how to troubleshoot some common issues:
Issue #1: Shortcut Not Working
If your keyboard shortcut isn’t working, try these steps:
- Make sure your keyboard drivers are up to date.
- Check if the
Print Screenbutton is functioning properly. - Restart your Surface Pro and try again.
Issue #2: Screenshot Not Saving
Can’t find your screenshot? Here’s what to do:
- Check the
Picturesfolder underScreenshots. - Verify that your screenshots are being saved to the correct location.
- Try using a different method, like Snip & Sketch.
How to Print Screen on Surface Pro with Windows 11
Windows 11 brings some exciting new features to the table. Here’s how to print screen on a Surface Pro running Windows 11:
Using the New Snipping Tool
Windows 11 combines Snip & Sketch with the classic Snipping Tool for a more streamlined experience.
- Open the
Snipping Toolfrom the Start menu. - Select your preferred capture mode.
- Click
Newto take your screenshot. - Edit and save your screenshot directly within the tool.
This new tool is faster and more intuitive, making it a great choice for Surface Pro users.
Data and Statistics: Why Screenshots Matter
According to a recent study, over 80% of users rely on screenshots to communicate visually. Whether it’s for work, school, or personal use, screenshots are an essential part of modern communication.
Additionally, Surface Pro users are more likely to use screenshots for creative purposes, such as designing presentations or creating tutorials. With its lightweight design and powerful capabilities, the Surface Pro is the perfect device for on-the-go screen capturing.
Conclusion: Mastering Print Screen on Your Surface Pro
Taking screenshots on a Surface Pro doesn’t have to be a headache. By following the methods and tips outlined in this guide, you’ll be able to capture and save screens like a pro.
Here’s a quick recap of what we covered:
- Using keyboard shortcuts for quick captures.
- Exploring advanced tools like Snip & Sketch and Game Bar.
- Troubleshooting common issues.
- Staying updated with Windows 11 features.
Now it’s your turn! Try out these methods and let us know which one works best for you. Don’t forget to share this guide with your friends and leave a comment below. Happy screenshotting!
Table of Contents
- Why Mastering Print Screen on Surface Pro Matters
- Common Misconceptions About Print Screen
- How to Print Screen on a Surface Pro: Step-by-Step
- Method 1: Using the Keyboard Shortcut
- Method 2: Using Snip & Sketch
- Advanced Tips for Print Screen Mastery
- Tip #1: Use Game Bar for Quick Captures
- Tip #2: Customize Your Shortcut Keys
- Tip #3: Use Third-Party Apps for Extra Features
- Troubleshooting Common Issues
- How to Print Screen on Surface Pro with Windows 11

![How to Screen Record on Surface Pro Easily [2025]](https://recorder.easeus.com/images/en/screen-recorder/resource/how-to-screen-record-on-surface-pro.png)
