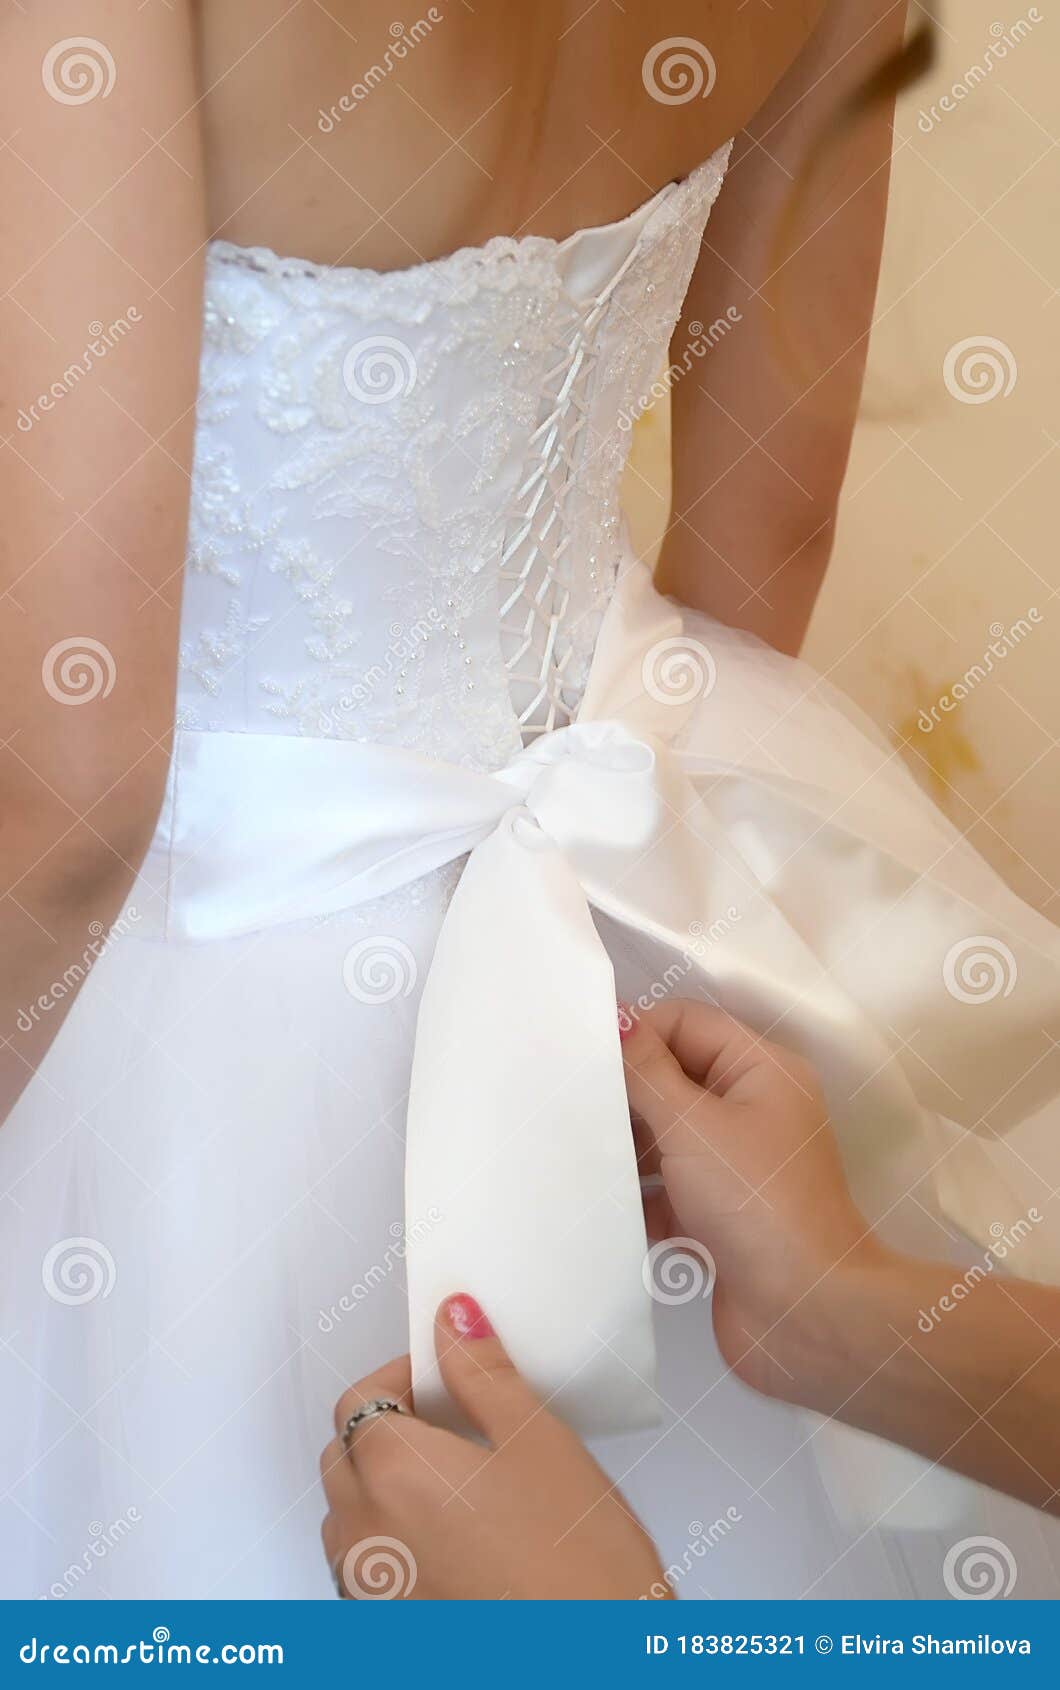
Hey there, fashionista! Ever found yourself staring at that beautiful dress with a bow on the back and thought, "Uh, how am I supposed to do this?" Don't worry, you're not alone. Learning how to tie a bow on the back of a dress can seem intimidating at first, but trust me, it's way easier than it looks. In this guide, we're gonna break it down step by step so you can rock that dress like a pro. This isn't just about tying knots—it's about feeling confident and stylish, and we're here to help you get there.
Let's be real for a second. Dresses with bows on the back are super chic, but they can also be a little tricky if you're not familiar with the technique. Whether you're dressing up for a fancy event or just want to elevate your everyday look, mastering this skill is totally worth it. And don't worry if you're new to this—by the end of this article, you'll be tying bows like a fashionista extraordinaire.
So, buckle up because we're diving deep into the world of back bows. From the tools you'll need to the exact steps you should follow, we've got you covered. Let's make sure you're ready to conquer any dress that comes your way. Here's how to tie a bow on the back of a dress, made simple and stylish for you!
Why Mastering Back Bow Tying Matters
Listen up, folks. Dresses with back bows aren't just about looking good—they're about feeling good. When you tie that bow perfectly, it's like putting the cherry on top of an already amazing sundae. But why does it matter so much? Well, let's break it down:
- Confidence Boost: Knowing how to tie a bow on the back of a dress means you won't have to rely on someone else to help you out. That independence is a game-changer.
- Time-Saving: Let's be honest, we're all busy bees. Learning this skill means you can get ready faster and focus on what really matters—like snapping those IG-worthy pics.
- Style Points: A well-tied bow can elevate any outfit. It's the little detail that makes a big impact, and people will definitely notice.
See? It's not just about tying a knot; it's about enhancing your overall look and confidence. Now, let's move on to the nitty-gritty details.
Tools You'll Need to Tie a Bow on the Back
Before we dive into the steps, let's talk about the tools you'll need. Don't worry, nothing fancy here—just a few essentials that'll make your life easier:
- A mirror (preferably full-length)
- A hairbrush or comb (optional, but super helpful)
- Your trusty dress with the back bow
That's it! No complicated gadgets or tools required. The key is to use what you already have and make the most of it. Now that we've got our tools sorted, let's get into the fun part—the steps!
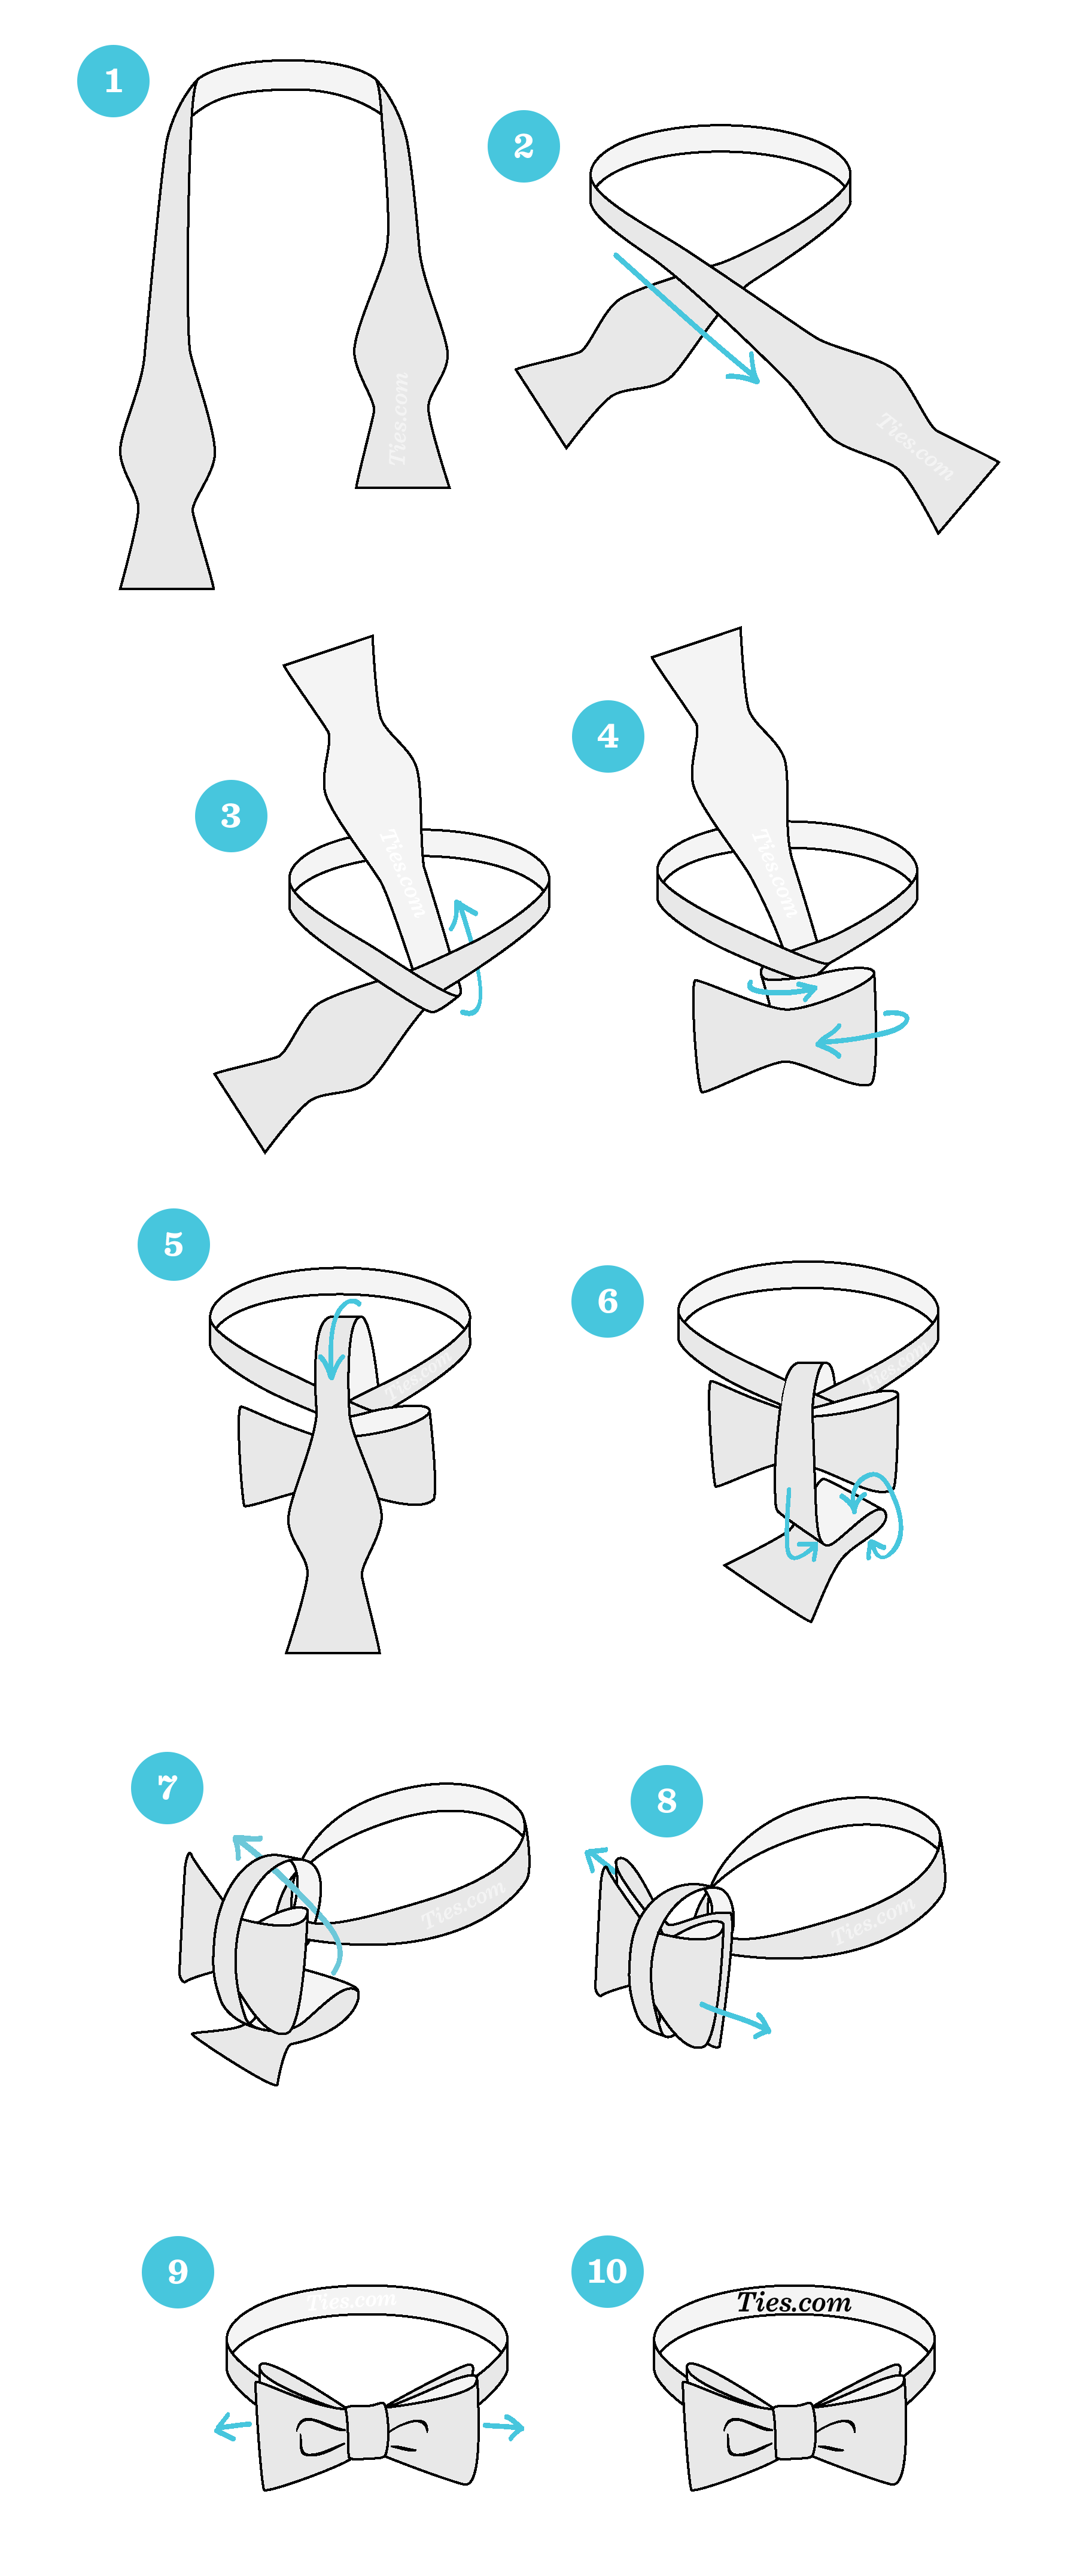
Step-by-Step Guide: How to Tie a Bow on the Back of a Dress
Step 1: Start with the Basics
Alright, let's get this party started. The first thing you need to do is put on your dress. Sounds simple, right? But here's the trick—make sure the straps or closures are secure before you even think about the bow. You don't want to be fiddling with them later on.
Step 2: Locate the Bow Ties
Now, take a deep breath and locate those little ties on the back of your dress. They're usually on either side of the waistline. If they're not exactly at the waist, don't panic. Just find them and make sure they're loose enough for you to work with.
Step 3: Cross the Ties
Here's where things get interesting. Take the left tie and cross it over the right tie. Then, bring the right tie over the left one. It's like a basic knot, but on the back. Use your mirror to guide you if you need to.
Step 4: Create the First Loop
Now, take one of the ties and form a loop. Make sure it's not too tight or too loose—just the right size for your bow. Hold it in place with one hand while you work on the other side.
Step 5: Create the Second Loop
Repeat the same process on the other side. You should now have two loops that are roughly the same size. This is where things start to look like an actual bow, so give yourself a little pat on the back.
Step 6: Tie It All Together
Take the loose ends of the ties and wrap them around the loops. This is where your hairbrush or comb comes in handy. Use it to hold the loops in place while you tighten the knot. Once it's secure, adjust the loops so they're even and symmetrical.
Step 7: Fluff and Finish
The final step is to fluff your bow. Gently pull on the loops and tails to make it look more polished and finished. And there you have it—a perfectly tied bow on the back of your dress!
Common Mistakes to Avoid
Now that you know the steps, let's talk about some common mistakes to avoid. Nobody's perfect, but these tips will help you avoid unnecessary headaches:
- Pulling Too Tight: A bow should be snug, but not suffocating. Make sure it's comfortable and not cutting off circulation.
- Ignoring Symmetry: Your loops should be even and balanced. If one side is bigger than the other, it'll look off.
- Forgetting to Adjust: Once you've tied the bow, take a moment to fluff and adjust it. It makes a huge difference in the overall look.
By avoiding these common mistakes, you'll be able to create a bow that looks polished and professional every time.
Expert Tips for Perfecting Your Bow
Want to take your bow-tying skills to the next level? Here are a few expert tips to help you perfect your technique:
- Practice Makes Perfect: The more you practice, the better you'll get. Try tying bows on different dresses to get a feel for how they work.
- Use a Hairbrush: As we mentioned earlier, a hairbrush can be a lifesaver when it comes to holding loops in place. Don't underestimate its power!
- Watch Tutorials: Sometimes, seeing someone else do it can make all the difference. Check out some YouTube tutorials for visual guidance.
These tips might seem simple, but they can make a huge difference in your results. So, don't be afraid to experiment and find what works best for you.
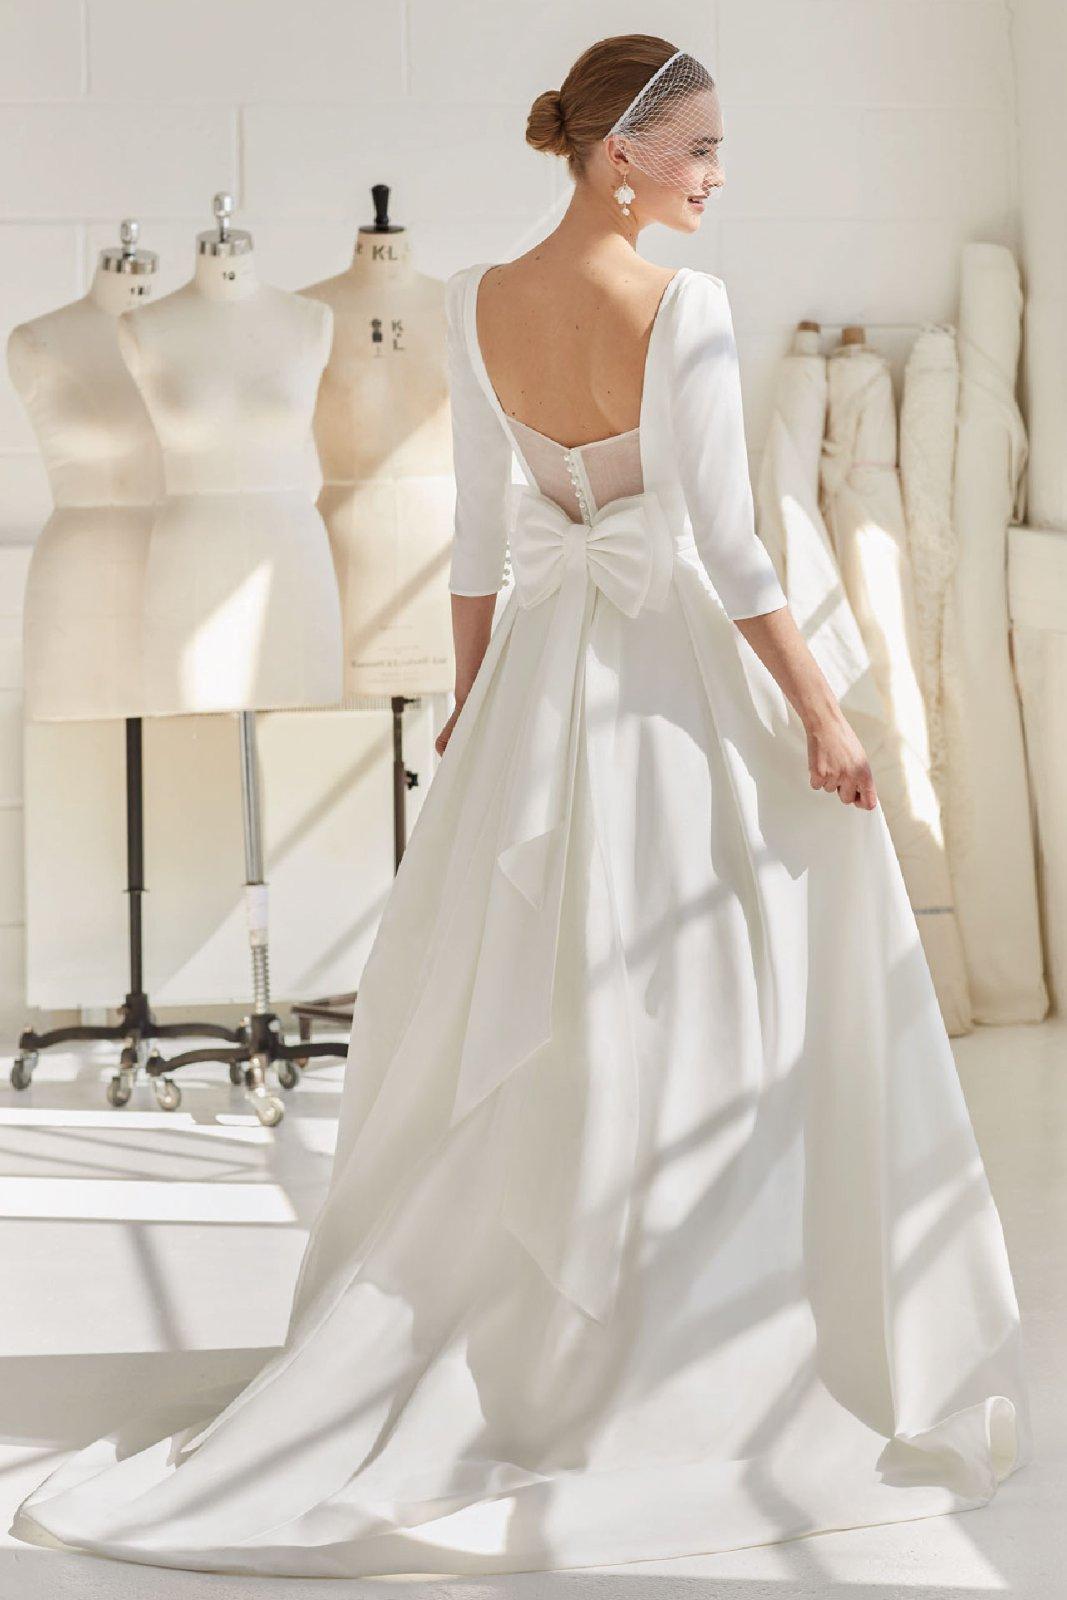
Benefits of Wearing Dresses with Back Bows
Now that you know how to tie a bow on the back of a dress, let's talk about why you should wear them. Dresses with back bows are more than just a fashion statement—they're a confidence booster:
- Unique Style: Bows add a touch of elegance and uniqueness to any outfit. They're a great way to stand out in a crowd.
- Versatility: You can wear them for formal events, casual outings, or even work. The possibilities are endless!
- Personalization: The way you tie your bow can reflect your personal style. Whether you prefer a neat, polished look or something more relaxed, it's all up to you.
So, why not embrace the versatility and style that back bows offer? They're a fun and easy way to elevate your wardrobe.
How to Choose the Right Dress with a Back Bow
Not all dresses with back bows are created equal. When choosing one, consider the following:
- Material: Look for dresses made from high-quality materials that drape well. This will make tying the bow easier and more comfortable.
- Fit: Make sure the dress fits you well. A dress that's too tight or too loose can make tying the bow more challenging.
- Color: Choose a color that complements your skin tone and makes you feel confident.
By keeping these factors in mind, you'll be able to find a dress that not only looks great but also makes tying the bow a breeze.
Real-Life Examples: Celebrities and Back Bow Dresses
Let's take a moment to appreciate some real-life examples of celebrities rocking back bow dresses. From red carpet events to casual outings, these ladies know how to make a statement:
- Kate Middleton: The Duchess of Cambridge has been spotted in several stunning dresses with back bows, proving that they're perfect for formal occasions.
- Zendaya: This fashion icon has worn back bow dresses on multiple occasions, showing off her unique and bold style.
- Emma Watson: Known for her classic yet modern style, Emma has rocked back bow dresses with ease and elegance.
These ladies are proof that back bow dresses can be both stylish and sophisticated. Take inspiration from them and create your own look!
Conclusion: Your Turn to Shine
And there you have it, folks! Learning how to tie a bow on the back of a dress isn't as hard as it seems. With a little practice and the right tools, you'll be tying bows like a pro in no time. Remember, it's not just about the bow—it's about feeling confident and stylish in your own skin.
So, what are you waiting for? Grab that dress, follow these steps, and show the world how amazing you look. And don't forget to share your experience in the comments below. We'd love to hear how it went!
Table of Contents
- Why Mastering Back Bow Tying Matters
- Tools You'll Need to Tie a Bow on the Back
- Step-by-Step Guide: How to Tie a Bow on the Back of a Dress
- Common Mistakes to Avoid
- Expert Tips for Perfecting Your Bow
- Benefits of Wearing Dresses with Back Bows
- How to Choose the Right Dress with a Back Bow
- Real-Life Examples: Celebrities and Back Bow Dresses
- Conclusion: Your Turn to Shine