Alright folks, let’s get straight to the point—Yorkies are cute AF, and if you’re here, chances are you want to immortalize their cuteness on paper. Drawing a Yorkshire Terrier might seem intimidating, but trust me, it’s totally doable! Whether you’re a beginner or someone looking to refine your skills, this guide will walk you through every step. So grab your pencils, erasers, and let’s dive into how to draw a Yorkshire Terrier!
Now, before we jump into the nitty-gritty, let me tell you something: drawing doesn’t have to be perfect. It’s all about having fun and letting your creativity flow. Think of it like sketching your furry friend’s personality onto paper. Plus, Yorkshire Terriers are such iconic dogs with their luxurious fur and tiny paws, so capturing their essence is half the battle!
By the end of this guide, you’ll not only know how to draw a Yorkshire Terrier but also understand the nuances that make them so unique. Ready? Let’s go!
Here’s a quick rundown of what we’ll cover:
- Introduction to Yorkshire Terriers
- Tools You Need
- Understanding Yorkie Features
- Step-by-Step Drawing Guide
- Adding Details to Your Sketch
- Shading and Texture
- Common Mistakes to Avoid
- Tips for Beginners
- Advanced Techniques
- Inspiration and Practice
Introduction to Yorkshire Terriers
First things first, let’s talk about Yorkies. These pint-sized pups are more than just lap dogs—they’re little bundles of energy wrapped in silky fur. Known for their loyalty, intelligence, and sassy personalities, Yorkshire Terriers have captured the hearts of dog lovers worldwide.
Why Are Yorkies So Popular?
Yorkshire Terriers have been around since the 19th century, originating in England. They were originally bred to hunt rats in textile mills, but their charm quickly made them a favorite among the upper class. Today, they’re one of the most popular toy breeds, and it’s easy to see why. With their striking coat, expressive eyes, and playful nature, they’re the perfect muse for any aspiring artist.
So, if you’re wondering why you should learn how to draw a Yorkshire Terrier, the answer is simple: because they’re adorable and make for an excellent subject. Plus, mastering their features will give you the confidence to tackle other breeds.
Tools You Need
Before we start sketching, let’s gather our tools. You don’t need anything fancy—just the basics will do. Here’s what you’ll need:
- Pencils (HB, 2B, 4B, 6B)
- Eraser (a kneaded eraser is great for precision)
- Sketchbook or drawing paper
- Blending tools (optional)
- Reference photos (Google is your friend here)
Having the right tools makes all the difference. And hey, don’t forget to keep your workspace clean. Nothing ruins creativity faster than a smudged drawing!
Understanding Yorkie Features
Yorkshire Terriers have distinct features that set them apart from other breeds. Understanding these details is key to creating an accurate and lifelike drawing.
Key Features to Focus On
- Coat: Yorkies are famous for their long, silky fur. Their coat is usually a combination of blue and tan, with a glossy sheen.
- Eyes: Their eyes are dark and round, full of expression and mischief.
- Ears: Erect and triangular, Yorkie ears add to their alert and curious demeanor.
- Body: Compact and well-proportioned, with a graceful stance.
Pay attention to these details as you sketch. They’ll help bring your Yorkie to life on paper.
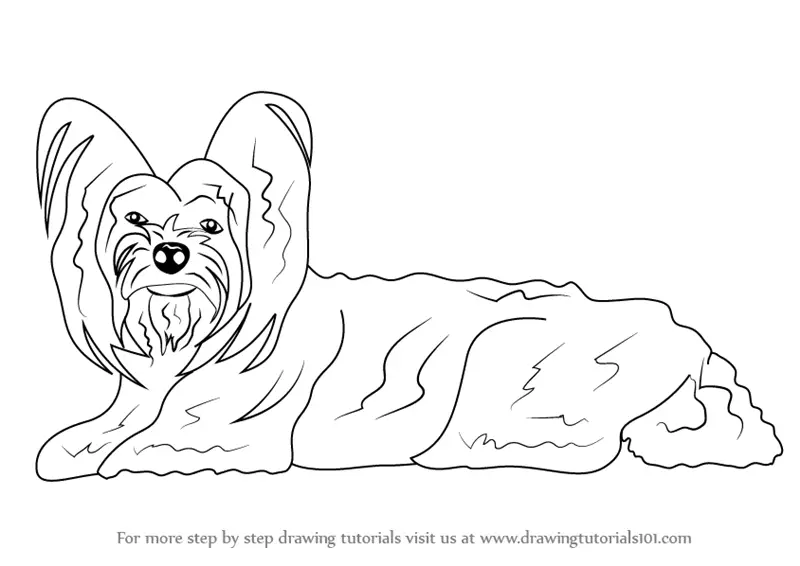
Step-by-Step Drawing Guide
Now that you’re familiar with Yorkie features, let’s dive into the drawing process. Follow these steps, and you’ll have a beautiful sketch in no time.
Step 1: Sketch the Basic Shape
Start by drawing a circle for the head and an oval for the body. These will serve as the foundation for your Yorkie. Don’t worry about perfection—these are just guidelines.
Step 2: Add Facial Features
Draw two small circles for the eyes and a triangular shape for the nose. Sketch the mouth lightly, keeping it proportionate to the head.
Step 3: Outline the Ears
Yorkie ears are erect and triangular. Sketch them carefully, making sure they’re symmetrical.
Step 4: Define the Body
Connect the head and body with smooth lines. Add legs and paws, keeping in mind the Yorkie’s compact size.
Step 5: Draw the Tail
Yorkies have a short, docked tail. Sketch it lightly, ensuring it’s in proportion to the rest of the body.
Adding Details to Your Sketch
Once you’ve outlined the basic shape, it’s time to add details. This is where your Yorkie starts to come alive.
Focus on the Fur
Yorkshire Terriers are known for their luxurious coat. Use light, flowing lines to capture the texture and movement of their fur. Pay attention to how the fur falls around their face and body.
Enhance the Eyes
Eyes are the windows to the soul, and in this case, your Yorkie’s soul. Add shading around the eyes to create depth and make them pop.
Remember, details make all the difference. Take your time and enjoy the process.
Shading and Texture
Shading is what gives your drawing dimension and realism. Here’s how to approach it:
- Use a range of pencils (HB to 6B) to create different shades.
- Start with light shading and gradually build up to darker tones.
- Pay attention to light sources and how they affect shadows.
For texture, think about how the fur flows and overlaps. Use short, layered strokes to mimic the look of a Yorkie’s coat.
Common Mistakes to Avoid
Even the best artists make mistakes. Here are a few to watch out for:
- Overworking the fur: Too much detail can make your drawing look messy.
- Ignoring proportions: Keep the head, body, and legs in proportion to avoid a distorted look.
- Forgetting the ears: Yorkie ears are a defining feature—don’t neglect them!
By being mindful of these mistakes, you’ll improve your skills and create better drawings.
Tips for Beginners
If you’re new to drawing, here are some tips to help you get started:
- Practice regularly: Consistency is key to improvement.
- Use reference photos: They’ll help you understand anatomy and proportions.
- Don’t be afraid to make mistakes: Every mistake is a learning opportunity.
Remember, everyone starts somewhere. The more you practice, the better you’ll get.
Advanced Techniques
Once you’ve mastered the basics, it’s time to level up your skills. Here are a few advanced techniques to try:
- Blending: Use blending tools to create smooth transitions between shades.
- Layering: Build up layers of graphite to add depth and richness to your drawing.
- Experiment with mediums: Try colored pencils or watercolors for a different look.
These techniques will take your Yorkie drawings to the next level.
Inspiration and Practice
Finally, let’s talk about inspiration. Look at professional artists’ work, study anatomy, and most importantly, practice. The more you draw, the more confident you’ll become.
And remember, drawing is a journey. Enjoy every step of it, and don’t be afraid to let your personality shine through your art.
So there you have it, folks—a complete guide on how to draw a Yorkshire Terrier. Whether you’re a beginner or an experienced artist, I hope this guide has inspired you to pick up your pencil and start sketching. Now go forth and create—your Yorkie masterpiece awaits!
Oh, and don’t forget to share your drawings with us. We’d love to see what you’ve created!