Hey there, fashionistas and DIY enthusiasts! Ever wondered how to cut a shirt up without turning it into a disaster? Well, buckle up because we’re about to dive into the ultimate guide on how to cut a shirt up like a pro. Whether you’re looking to revamp an old tee or create a trendy cropped top, this guide has got you covered. So grab your scissors and let’s get started!
Now, before we jump into the nitty-gritty, let’s talk about why cutting a shirt might just be the next big thing for your wardrobe. Let’s be honest—clothes can get boring after a while. But instead of throwing away that old shirt, why not transform it into something fresh and new? Cutting a shirt isn’t just about saving money; it’s about unleashing your creativity and making a statement.
But wait, there’s more! Learning how to cut a shirt up is also a fun way to personalize your style. From cropped cuts to trendy slits, the possibilities are endless. So, if you’re ready to take your fashion game to the next level, keep reading because we’ve got all the tips and tricks you need to turn that plain old shirt into a masterpiece.
Why Cutting a Shirt Is the Ultimate DIY Project
Let’s face it—DIY projects are having a moment, and cutting a shirt is no exception. It’s not just about saving money (although that’s definitely a perk). It’s about expressing yourself and adding a personal touch to your wardrobe. Plus, it’s a great way to reduce waste by giving old clothes a new life.
Think about it: when was the last time you wore that shirt that’s been sitting in the back of your closet? Cutting it up could give it a second chance. And who knows? You might even discover a hidden talent for fashion design along the way.
Benefits of Learning How to Cut a Shirt Up
- Cost-Effective: Transforming old clothes into new ones saves you from splurging on expensive new pieces.
- Personalization: Customize your shirt to fit your unique style and preferences.
- Sustainability: Reduce waste by upcycling clothes instead of throwing them away.
- Creativity Boost: Let your imagination run wild and experiment with different cuts and designs.
So, whether you’re a seasoned DIYer or a complete beginner, cutting a shirt is a project that anyone can tackle. Just remember, practice makes perfect, and sometimes the best designs come from happy accidents!
Tools You’ll Need to Get Started
Before we get into the cutting part, let’s talk about the tools you’ll need. Don’t worry, you don’t need a fancy sewing machine or expensive equipment. Here’s what you’ll need:
- A pair of sharp scissors (seriously, don’t use those dull ones from the kitchen drawer)
- A measuring tape (optional, but helpful if you want precise cuts)
- A fabric marker or chalk (for marking your cuts)
- A ruler or straight edge (for straight cuts)
- An old shirt to practice on (optional, but highly recommended)
Got all that? Great! Now let’s move on to the next step.
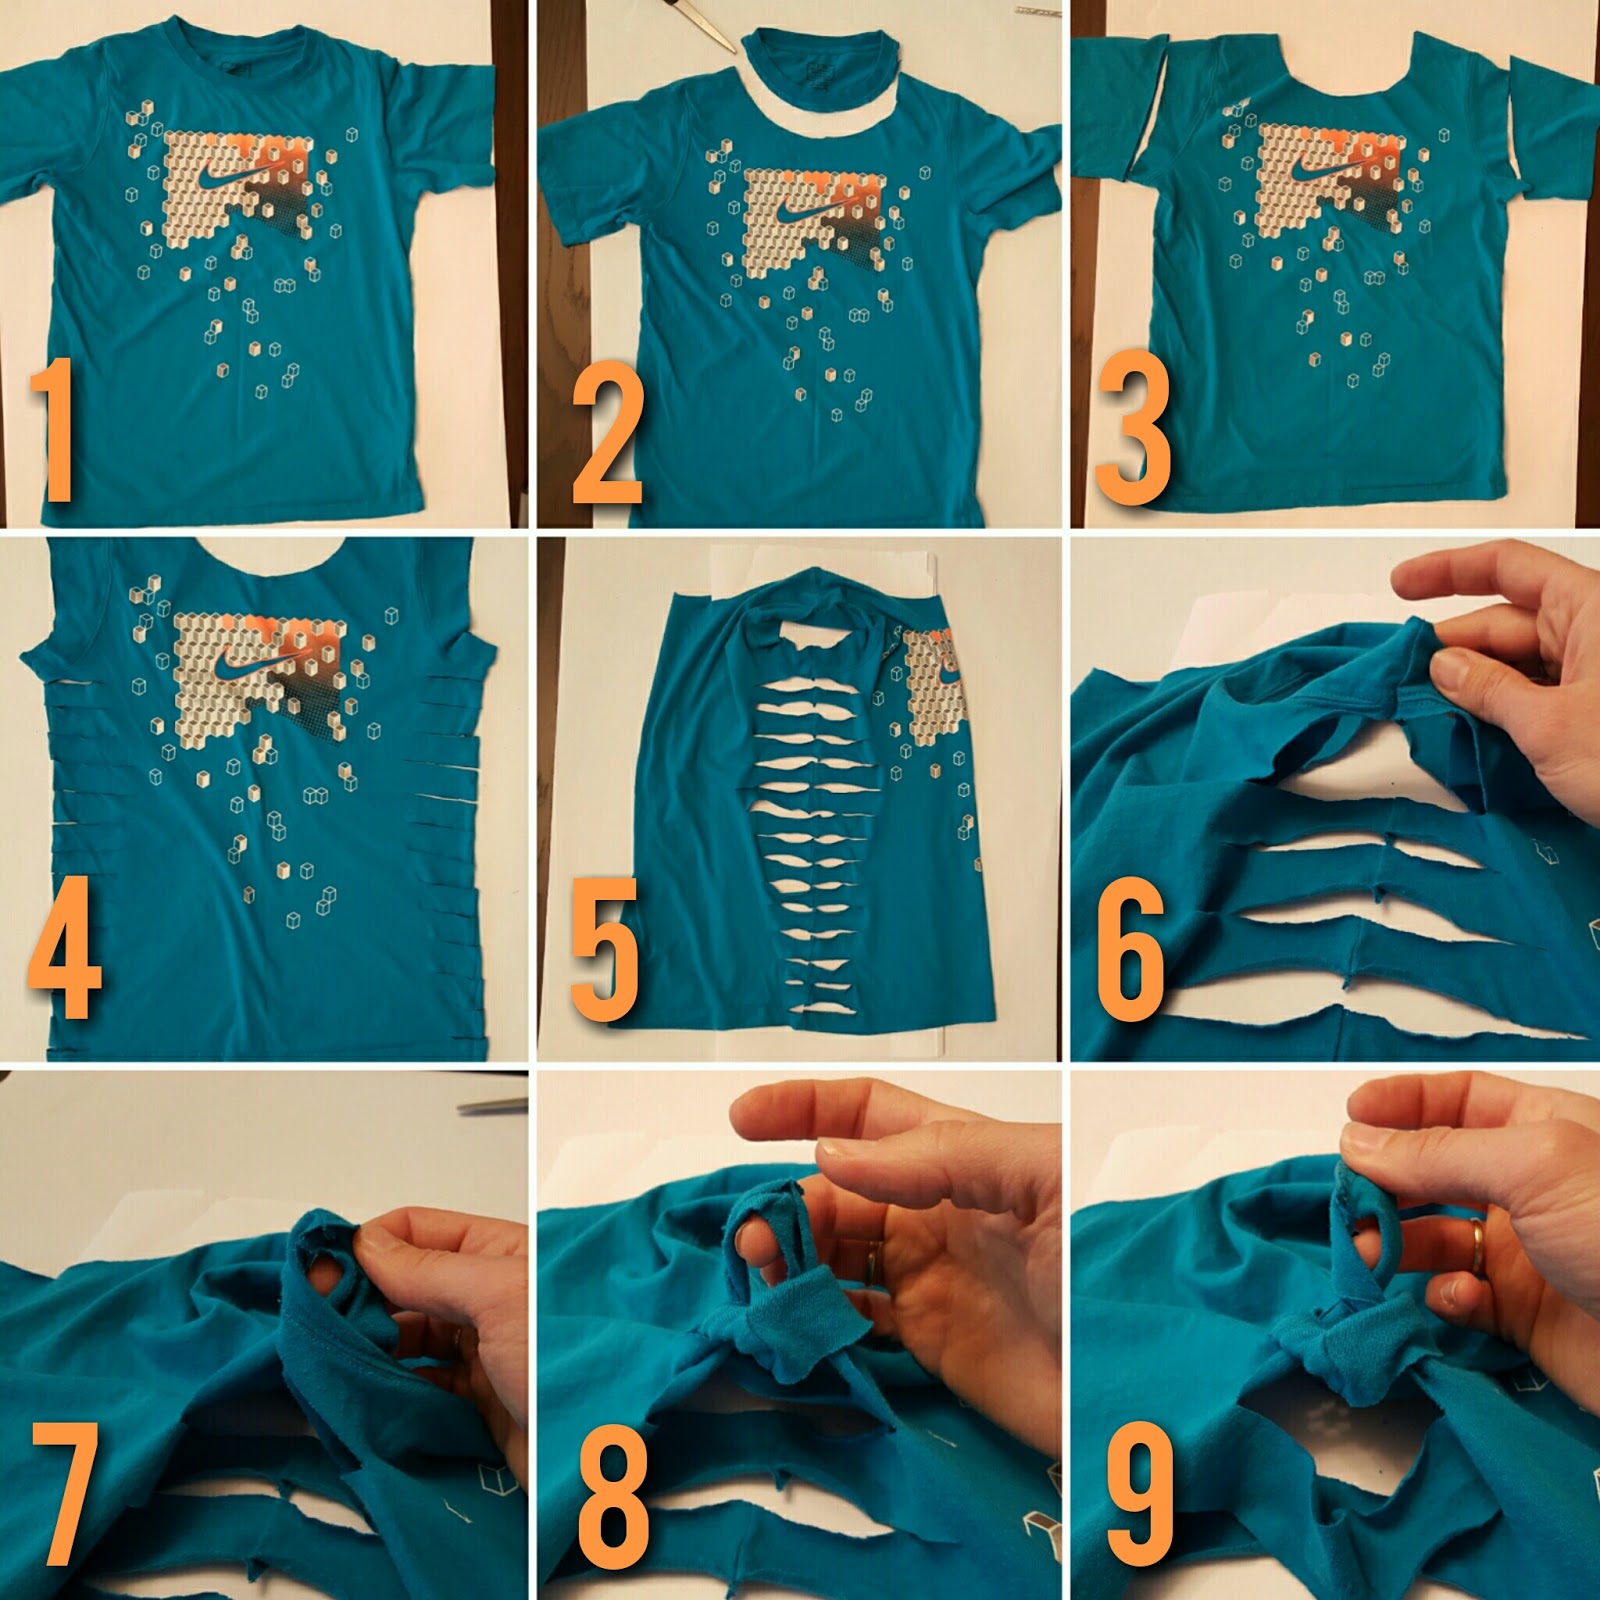
Step-by-Step Guide on How to Cut a Shirt Up
Step 1: Choose Your Shirt
Picking the right shirt is crucial. You want something that’s comfortable and fits well. If you’re a beginner, start with a basic cotton tee. It’s easier to work with and less likely to fray. Plus, if you mess up, it’s not the end of the world.
Pro Tip: Look for shirts made from natural fibers like cotton or linen. They’re easier to cut and less likely to unravel compared to synthetic materials.
Step 2: Decide on Your Design
Now it’s time to get creative. What kind of cut are you going for? Here are a few ideas to inspire you:
- Cropped Cut: Perfect for showing off your abs or pairing with high-waisted jeans.
- Tie-Dye Crop: Add some color to your shirt by tie-dying it after cutting.
- Slit Sleeves: Cut slits into the sleeves for a trendy, boho look.
- Off-the-Shoulder: Cut the neckline to create an off-the-shoulder style.
Remember, the sky’s the limit when it comes to design. Don’t be afraid to experiment and try something new!
Step 3: Mark Your Cuts
Once you’ve decided on your design, it’s time to mark your cuts. Use a fabric marker or chalk to draw your design onto the shirt. This will help ensure your cuts are even and precise.
If you’re feeling extra adventurous, skip the markings and go freehand. Just be prepared for some unexpected results!
Step 4: Cut with Confidence
Now comes the fun part—cutting! Take your scissors and carefully follow the lines you’ve marked. If you’re cutting a straight line, use a ruler or straight edge to guide your scissors. And if you’re cutting curves, take your time and go slow to avoid mistakes.
Pro Tip: If you’re worried about fraying, finish the edges with a zigzag stitch or use fabric glue to seal them.
Tips and Tricks for Cutting a Shirt Like a Pro
Here are a few extra tips to help you master the art of cutting a shirt:
- Practice on Old Clothes: Don’t be afraid to experiment with shirts you don’t mind ruining.
- Use Sharp Scissors: Dull scissors can lead to uneven cuts and frustration.
- Work in Good Lighting: Make sure you’re cutting in a well-lit area to avoid mistakes.
- Take Your Time: Rushing can lead to errors, so take your time and enjoy the process.
By following these tips, you’ll be cutting shirts like a pro in no time!
Common Mistakes to Avoid
Even the best DIYers make mistakes sometimes. Here are a few common pitfalls to watch out for:
- Cutting Too Much Fabric: It’s easier to cut more than to add fabric back, so start small.
- Not Measuring Properly: Take the time to measure and mark your cuts to avoid uneven results.
- Using the Wrong Tools: Dull scissors or the wrong type of fabric can make cutting much harder.
Remember, mistakes are part of the learning process. Don’t get discouraged if things don’t turn out perfectly the first time. Practice makes perfect!
How to Customize Your Cut
Adding Embellishments
Once you’ve cut your shirt, why not add some extra flair? Here are a few ideas:
- Iron-On Patches: Add some personality with cute patches.
- Rhinestones: Bling it up with some sparkly rhinestones.
- Fabric Paint: Get creative with fabric paint and add some fun designs.
Customizing your shirt is a great way to make it truly unique. So don’t be afraid to let your creativity shine!
How to Care for Your Newly Cut Shirt
Now that you’ve put all that effort into cutting your shirt, you’ll want to make sure it lasts. Here are a few tips for caring for your new creation:
- Wash Gently: Use a mild detergent and wash your shirt on a delicate cycle.
- Avoid Bleach: Bleach can damage the fabric and ruin your design.
- Hang to Dry: Skip the dryer and let your shirt air dry to prevent shrinking.
By taking good care of your shirt, you’ll ensure it stays looking great for years to come.
Conclusion: Let Your Creativity Shine
And there you have it, folks! A complete guide on how to cut a shirt up like a pro. Whether you’re looking to create a trendy cropped top or add some unique embellishments, the possibilities are endless. So grab those scissors and let your creativity run wild!
Don’t forget to share your creations with us in the comments below. We’d love to see what you come up with. And if you enjoyed this guide, be sure to check out our other articles for more DIY fashion tips and tricks. Happy cutting!
Table of Contents