Let’s talk about how to do a box stitch lanyard, shall we? If you’re here, chances are you’re either curious about crafting or you’ve been tasked with making one for a project. Whether it’s for a school event, a corporate giveaway, or just a fun DIY activity, mastering the box stitch lanyard can be a game-changer. This guide will walk you through everything you need to know, from the basics to the advanced techniques.
Now, before we dive deep into the nitty-gritty details, let me tell you something cool. The box stitch lanyard is not just a piece of string with a keychain. It’s a symbol of creativity, practicality, and personalization. You can customize it to match your style, add logos, or even create unique patterns. So, buckle up, because we’re about to take you on a crafting adventure like no other.
One thing to keep in mind is that learning how to do a box stitch lanyard doesn’t happen overnight. It takes practice, patience, and a bit of trial and error. But hey, that’s the beauty of crafting—every mistake is a lesson learned. By the end of this guide, you’ll be weaving like a pro, impressing your friends and family with your newfound skills. Let’s get started!
What Is a Box Stitch Lanyard Anyway?
First things first, let’s break down what exactly a box stitch lanyard is. In its simplest form, it’s a lanyard made using the box stitch technique. Think of it as a series of loops and knots that create a sturdy, interwoven pattern resembling a box. This method is popular because it’s both durable and visually appealing. Plus, it’s versatile enough to be used for anything from holding IDs to carrying badges at events.
Here’s the kicker: box stitch lanyards are not just functional—they’re also customizable. You can choose from a wide range of colors, add charms, or even incorporate logos. This makes them perfect for branding purposes or simply as a personal accessory. Whether you’re a beginner or a seasoned crafter, learning how to do a box stitch lanyard opens up endless possibilities.
Why Should You Learn the Box Stitch Technique?
Alright, so why should you bother learning how to do a box stitch lanyard? Well, for starters, it’s a skill that can come in handy more often than you think. Imagine being the go-to person at your office or school for custom lanyards. Or picture yourself creating personalized gifts for friends and family. The possibilities are endless!
Plus, crafting has been shown to reduce stress and improve mental health. So, not only are you learning a practical skill, but you’re also doing something good for your mind and body. And let’s not forget the sense of accomplishment you’ll feel every time you finish a project. Trust me, it’s addictive!
Tools and Materials You’ll Need
Before you start learning how to do a box stitch lanyard, you’ll need to gather a few essential tools and materials. Don’t worry, most of these are easy to find and affordable. Here’s a quick rundown:
- Lanyard cord (various colors available)
- Box stitch lanyard tool or a simple needle
- Scissors
- Keyring or lobster clasp (optional)
- Ruler or measuring tape
Pro tip: If you’re a beginner, start with a basic lanyard cord in a single color. Once you get the hang of it, you can experiment with multi-colored cords to create more intricate designs.
Where to Buy Lanyard Supplies
Now that you know what you need, where do you buy these supplies? Fortunately, you have plenty of options. Most craft stores carry lanyard cords and tools. You can also find them online on platforms like Amazon or Etsy. Just make sure to read reviews and check the quality before making a purchase.
If you’re on a budget, consider checking out local thrift stores or garage sales. Sometimes you can find crafting supplies at a fraction of the cost. And hey, who doesn’t love a good bargain?
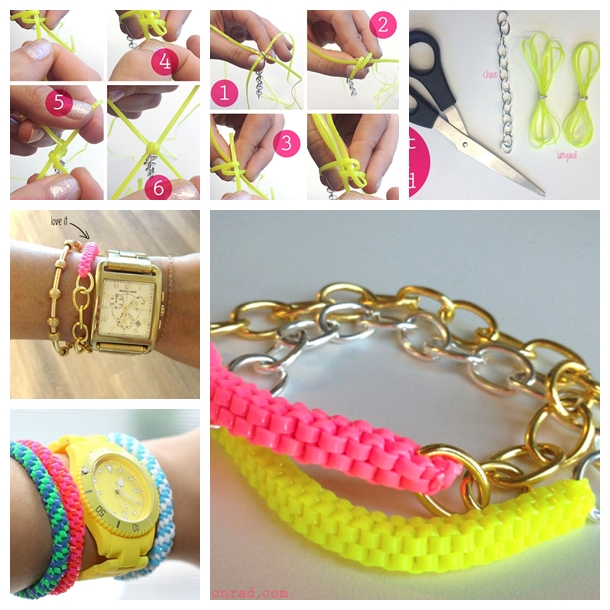
Step-by-Step Guide to Box Stitch Lanyard
Alright, let’s get down to business. Here’s a step-by-step guide on how to do a box stitch lanyard:
Step 1: Measure and Cut Your Cord
First, measure the length of lanyard you need. For most standard lanyards, 48 inches is a good starting point. Once you’ve measured, cut your cord using sharp scissors. Make sure the ends are clean and even to avoid fraying.
Step 2: Secure the Starting Knot
Next, tie a knot at one end of the cord to prevent it from unraveling. This will also serve as the starting point for your box stitch pattern. You can use a simple overhand knot or a double knot for extra security.
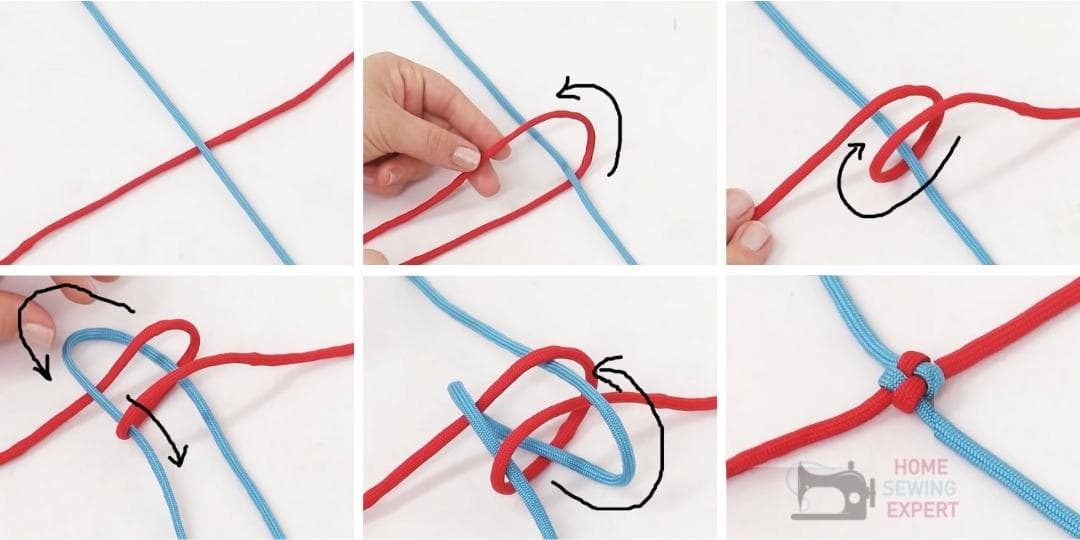
Step 3: Begin the Box Stitch
Now comes the fun part—creating the box stitch pattern. Here’s how you do it:
- Take one end of the cord and loop it over the other end, forming a cross.
- Take the bottom cord and weave it under the top cord, then bring it back up through the loop.
- Pull both ends tight to form the first stitch.
- Repeat this process, alternating the direction of the loops to create a box-like pattern.
Remember, the key to a successful box stitch is consistency. Make sure each stitch is tight and even to achieve a professional look.
Tips and Tricks for Perfecting Your Box Stitch
Even the best crafters need a few tips and tricks to perfect their skills. Here are some insider secrets to help you master how to do a box stitch lanyard:
- Use a lanyard tool to speed up the process and ensure even stitches.
- Practice on scrap cords before starting your final project.
- Experiment with different cord thicknesses to see which one works best for you.
- Don’t be afraid to make mistakes—every error is a learning opportunity!
And here’s a little-known fact: the tighter your stitches, the more durable your lanyard will be. So, take your time and focus on quality over quantity.
Common Mistakes to Avoid
While learning how to do a box stitch lanyard, you might encounter a few common mistakes. Here’s how to avoid them:
- Not pulling the stitches tight enough, which can lead to a loose and uneven lanyard.
- Forgetting to secure the starting knot, causing the entire lanyard to unravel.
- Using cords that are too thin or too thick, which can affect the overall look and feel of the lanyard.
Trust me, once you’ve mastered these basics, you’ll be unstoppable!
Customizing Your Box Stitch Lanyard
One of the best things about learning how to do a box stitch lanyard is the ability to customize it to your liking. Here are a few ideas to get you started:
- Add charms or beads to create a unique design.
- Use different colored cords to form patterns or logos.
- Incorporate a keyring or lobster clasp for added functionality.
The sky’s the limit when it comes to customization. Let your creativity run wild and see what amazing designs you can come up with!
How to Add Logos to Your Lanyard
If you’re looking to add a logo or text to your box stitch lanyard, there are a few methods you can try. One popular option is to use heat transfer vinyl. Simply cut out your design using a vinyl cutter, apply it to the lanyard, and use a heat press to seal it in place. Another option is to use embroidery, which gives a more professional finish.
Whatever method you choose, make sure to test it on a scrap piece of cord first to ensure the best results.
Advanced Techniques for Box Stitch Lanyard
Once you’ve mastered the basics of how to do a box stitch lanyard, you can move on to more advanced techniques. Here are a few ideas to take your crafting skills to the next level:
- Try incorporating different stitch patterns, such as the spiral or chevron stitch.
- Experiment with thicker cords to create a more substantial lanyard.
- Combine multiple colors to create intricate designs and patterns.
Remember, the more you practice, the better you’ll get. So, don’t be afraid to step out of your comfort zone and try something new.
Troubleshooting Common Issues
Even the most experienced crafters encounter issues from time to time. Here’s how to troubleshoot some common problems:
- If your stitches are too loose, try pulling them tighter as you go.
- If your lanyard is unraveling, check your starting knot and make sure it’s secure.
- If your design isn’t turning out as expected, take a break and come back to it with fresh eyes.
Remember, crafting is all about trial and error. Keep practicing, and you’ll get the hang of it in no time!
Conclusion: Take Your Crafting Skills to the Next Level
In conclusion, learning how to do a box stitch lanyard is a rewarding and fulfilling experience. Not only does it allow you to create functional and stylish accessories, but it also offers a creative outlet for self-expression. By following the steps and tips outlined in this guide, you’ll be well on your way to becoming a lanyard crafting pro.
So, what are you waiting for? Grab your supplies, find a cozy spot, and start crafting. And don’t forget to share your creations with us in the comments below. We’d love to see what you come up with!
Table of Contents