So, you're thinking about trying out rubber band box braids, huh? Let's face it—this hairstyle has become a sensation, and for good reason. Not only does it look absolutely stunning, but it's also a great way to switch up your look without damaging your hair. Whether you're a beginner or someone who wants to perfect their braiding skills, we've got you covered. In this article, we'll dive deep into how to do rubber band box braids like a pro.
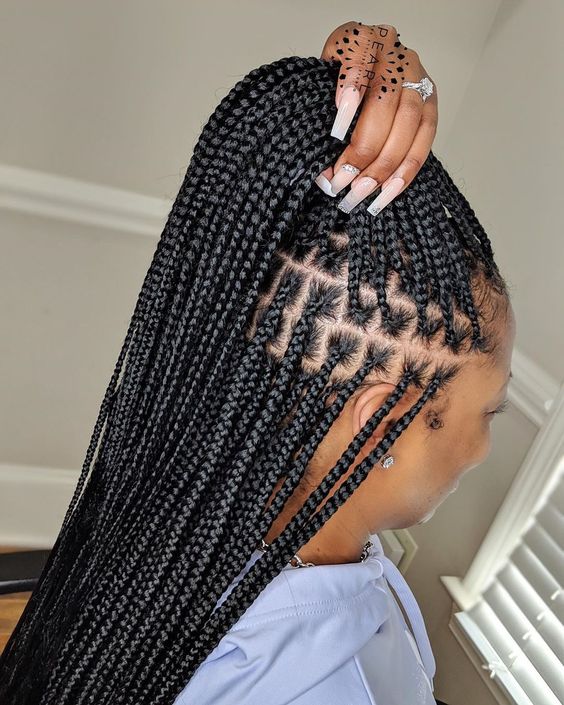
Box braids have been around for ages, but adding rubber bands takes this style to a whole new level. It's all about creating a clean, structured look that screams confidence. Plus, the added bonus of rubber bands gives your braids an extra flair and durability. Who wouldn’t want that?
Before we get into the nitty-gritty, let’s talk about why this hairstyle is such a game-changer. Rubber band box braids are versatile, easy to maintain, and can last for weeks if done correctly. So, whether you're attending a big event or just want to rock a fresh new look, this guide will walk you through every step of the process. Let’s get started!
Why Rubber Band Box Braids Are a Must-Try
First things first, let's break down why rubber band box braids are worth the hype. For starters, they’re incredibly low-maintenance compared to other hairstyles. You don’t have to worry about frequent touch-ups, and with the right techniques, they can last for weeks without losing their shape. Plus, the addition of rubber bands adds a unique texture and structure to your braids that makes them stand out.
Another reason to love this style? It’s super customizable. You can choose different colors, lengths, and thicknesses depending on your preferences. And let’s not forget the cultural significance of box braids—they’re a beautiful nod to African heritage and a celebration of diversity in hairstyles.
Now, let’s move on to the fun part—how to actually do rubber band box braids!
Tools and Materials You’ll Need
Before you start braiding, make sure you have all the necessary tools and materials. Having everything ready will save you time and make the process smoother. Here’s what you’ll need:
- Rubber bands (small and medium sizes)
- Synthetic hair (choose the color and texture that suits you)
- A rat-tail comb
- A wide-tooth comb
- Hair gel or edge control (optional)
- Hair clips
- A spray bottle with water
- A leave-in conditioner
Having these tools on hand will ensure that your braiding experience is as smooth as possible. Trust me, you don’t want to be running around looking for a rubber band in the middle of your styling session!
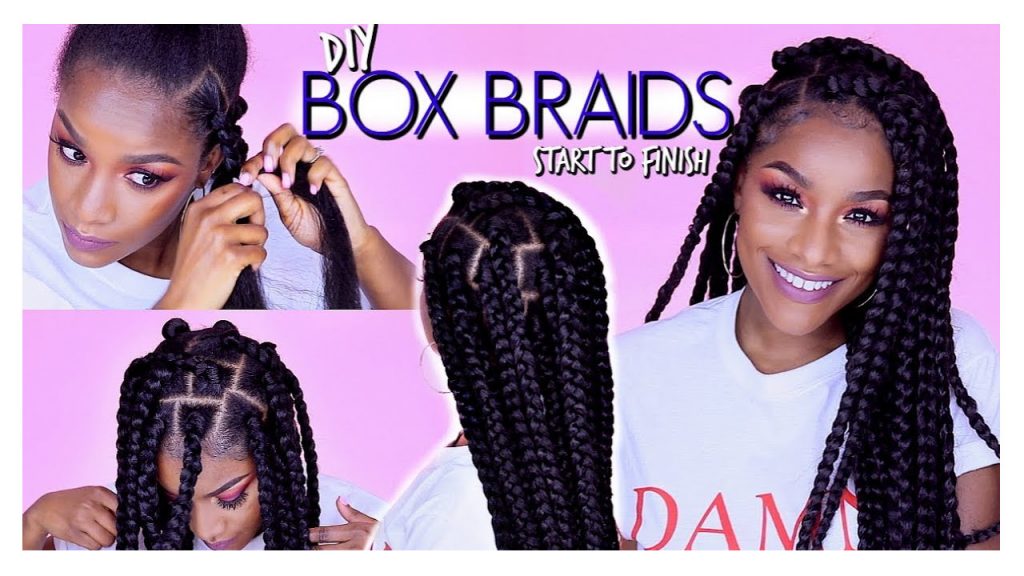
Step-by-Step Guide: How to Do Rubber Band Box Braids
Step 1: Prep Your Hair
Preparation is key when it comes to braiding. Start by washing and conditioning your hair to ensure it’s clean and tangle-free. Once your hair is dry, apply a leave-in conditioner to keep it hydrated. Use a wide-tooth comb to detangle your hair gently, section by section.
Pro tip: If your hair is particularly thick, you might want to divide it into smaller sections to make the braiding process easier.
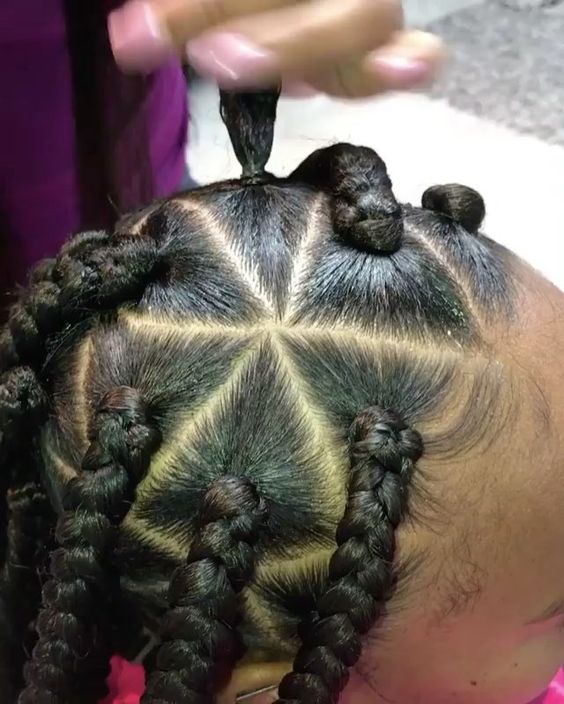
Step 2: Create Your Partings
Using a rat-tail comb, create neat and precise partings on your scalp. This is where the "box" in box braids comes from. Make sure your partings are even and symmetrical to achieve a clean, polished look.
Clip the sections you’re not working on to keep them out of the way. This will help you focus on one section at a time and prevent tangling.
Step 3: Start Braiding
Take a small section of your natural hair and begin the braid. Add synthetic hair to the section and start braiding in a three-strand technique. As you braid, make sure to keep the tension consistent to avoid loose or uneven braids.
When you reach the end of your natural hair, continue braiding the synthetic hair until you reach your desired length. Secure the braid with a small rubber band.
Step 4: Add Rubber Bands
This is where the magic happens! Once your braid is complete, add rubber bands along the length of the braid. Space them out evenly to create a uniform look. You can use small or medium rubber bands depending on your preference.
Pro tip: If you want a more textured look, twist the braid slightly before adding the rubber bands. This will give your braids an extra dimension.
Step 5: Repeat the Process
Move on to the next section and repeat the process. Keep your partings consistent and your braids even to maintain a cohesive look. Don’t rush this step—take your time to ensure each braid is perfect.
Remember to hydrate your scalp and edges as you go. This will keep your hair healthy and your edges looking sharp.
Tips and Tricks for Perfect Rubber Band Box Braids
Now that you know the basics, here are a few tips and tricks to take your rubber band box braids to the next level:
- Use high-quality synthetic hair for better results.
- Moisturize your scalp regularly to prevent dryness and itching.
- Avoid pulling your braids too tight, as this can cause tension headaches and damage your hairline.
- Experiment with different rubber band sizes and colors to add variety to your style.
- Sleep with a silk scarf or bonnet to protect your braids and keep them looking fresh.
These tips will help you maintain your braids and keep them looking fabulous for weeks.
Common Mistakes to Avoid
While rubber band box braids are relatively easy to do, there are a few common mistakes to watch out for:
- Not prepping your hair properly—this can lead to tangles and uneven braids.
- Using too many rubber bands—this can make your braids look bulky and heavy.
- Forgetting to moisturize your scalp—this can cause dryness and discomfort.
- Pulling your braids too tight—this can damage your hairline and cause breakage.
Avoiding these mistakes will ensure that your braids look great and feel comfortable.
How Long Do Rubber Band Box Braids Last?
With proper care, rubber band box braids can last anywhere from four to six weeks. The longevity of your braids depends on factors like your hair type, the quality of the synthetic hair, and how well you maintain them.
To extend the life of your braids, make sure to:
- Moisturize your scalp regularly.
- Avoid exposing your braids to excessive heat or humidity.
- Protect your braids at night by wearing a silk scarf or bonnet.
By following these tips, you can enjoy your rubber band box braids for weeks without compromising their quality.
How to Remove Rubber Band Box Braids
When it’s time to take your braids down, follow these steps for a smooth removal process:
- Gently undo each braid, starting from the bottom and working your way up.
- Use a wide-tooth comb to detangle your natural hair as you go.
- Moisturize your scalp and hair to restore hydration.
- Consider deep conditioning your hair to repair any damage caused by the braids.
Removing your braids carefully will help prevent breakage and keep your hair healthy.
Benefits of Rubber Band Box Braids
There are plenty of benefits to choosing rubber band box braids. Here are just a few:
- Low Maintenance: Once installed, rubber band box braids require minimal upkeep.
- Customizable: You can choose from a variety of colors, lengths, and textures to create a unique look.
- Durable: With the added support of rubber bands, these braids are less likely to unravel or lose their shape.
- Protective: Braiding your hair helps protect it from environmental damage and breakage.
These benefits make rubber band box braids a great option for anyone looking for a stylish and practical hairstyle.
Conclusion: Ready to Try Rubber Band Box Braids?
So, there you have it—a complete guide on how to do rubber band box braids like a pro. From preparation to maintenance, we’ve covered everything you need to know to achieve a stunning, long-lasting hairstyle. Whether you’re doing it yourself or visiting a professional, remember to take your time and enjoy the process.
Now, it’s your turn! Try out this hairstyle and let us know how it goes. Don’t forget to leave a comment or share this article with your friends who might be interested in trying rubber band box braids. And if you’re looking for more hair inspiration, be sure to check out our other articles. Happy braiding!
Table of Contents
- Why Rubber Band Box Braids Are a Must-Try
- Tools and Materials You’ll Need
- Step-by-Step Guide: How to Do Rubber Band Box Braids
- Step 1: Prep Your Hair
- Step 2: Create Your Partings
- Step 3: Start Braiding
- Step 4: Add Rubber Bands
- Step 5: Repeat the Process
- Tips and Tricks for Perfect Rubber Band Box Braids
- Common Mistakes to Avoid
- How Long Do Rubber Band Box Braids Last?
- How to Remove Rubber Band Box Braids
- Benefits of Rubber Band Box Braids
- Conclusion: Ready to Try Rubber Band Box Braids?