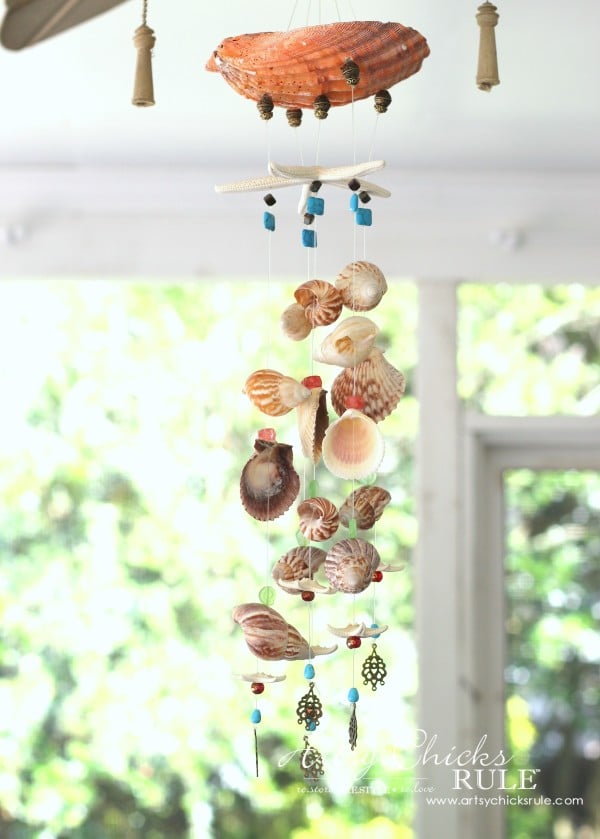
Listen up, y’all! There’s nothing quite like the soothing sound of wind chimes gently swaying in the breeze. And if you’re looking to bring a little slice of the beach into your home, then learning how to make a wind chime with seashells is totally your vibe. This DIY project is easy, fun, and super rewarding. Plus, it’s a great way to put those seashells you’ve been hoarding from your last vacation to good use. So, let’s dive in and get crafty, shall we?
Creating your own wind chime with seashells is one of those projects that feels so satisfying once it’s done. Not only does it add a personal touch to your space, but it also brings a calming atmosphere that’s perfect for relaxation. Whether you’re a seasoned crafter or a total newbie, this tutorial will guide you through every step. No fancy tools required—just some basic materials and a dash of creativity!
Before we jump into the nitty-gritty, let me just say this: making a wind chime with seashells isn’t just about creating something beautiful. It’s about channeling the energy of the ocean, capturing its serenity, and letting it flow into your everyday life. So grab your supplies, roll up your sleeves, and let’s turn those shells into music!
Why Seashells Are Perfect for Wind Chimes
You might be wondering why seashells are such a great choice for wind chimes. Well, my friend, it’s all about the natural beauty and uniqueness of each shell. Unlike mass-produced metal or wooden chimes, seashells have their own personality. Each one has its own texture, color, and shape, which makes your wind chime truly one-of-a-kind. Plus, they resonate beautifully when the wind blows, creating a gentle, melodic sound that’s hard to resist.
Benefits of Using Seashells
Here’s a quick rundown of why seashells are the ultimate material for DIY wind chimes:
- Natural Vibes: Seashells have an organic, earthy charm that connects you to nature.
- Lightweight: They’re easy to work with and won’t weigh down your wind chime.
- Unique Sounds: The varying sizes and shapes of seashells produce a variety of tones when they collide.
- Personal Touch: If you’ve collected the shells yourself, your wind chime becomes a keepsake of happy memories.
And let’s not forget, seashell wind chimes are eco-friendly! By repurposing shells instead of buying new materials, you’re doing your part to reduce waste. Now that’s what I call a win-win!
Gathering Your Materials
Alright, now that you’re sold on the idea, it’s time to gather your materials. Don’t worry, you probably already have most of these lying around. If not, they’re super easy (and cheap!) to find. Here’s what you’ll need:
What You’ll Need
- Seashells – Collect a variety of sizes and shapes for a more dynamic sound.
- String or fishing line – Strong, thin string works best. Fishing line is invisible and durable.
- A wooden or metal ring – This will serve as the base of your wind chime.
- Drill or needle – You’ll need this to create holes in the shells if they don’t already have them.
- Glue – Optional, but helpful for securing the shells to the string.
- A clapper – This is the piece that will hit the shells and produce sound. You can use a small wooden bead or even another shell.
Pro tip: If you’re using fishing line, make sure it’s strong enough to hold the weight of the shells. And if you’re drilling holes, be extra careful—shells can be fragile!
Step-by-Step Guide to Making Your Wind Chime
Now comes the fun part—actually making your wind chime! Follow these simple steps, and you’ll have a beautiful creation in no time.
Step 1: Clean Your Shells
First things first, give your shells a good clean. Rinse them under warm water and use a soft brush to remove any dirt or sand. Let them dry completely before you start working with them. Trust me, you don’t want gritty shells ruining your masterpiece!
Step 2: Drill Holes
Next, you’ll need to drill holes in the shells if they don’t already have them. Use a small drill bit or a needle to carefully create a hole near the top of each shell. Take your time and apply gentle pressure to avoid cracking the shells.
Step 3: Attach the String
Once your shells are ready, cut pieces of string or fishing line in different lengths. Thread the string through the holes in the shells and tie a knot at the top to secure them. You can use glue to reinforce the knots if you want extra security.
Step 4: Assemble the Wind Chime
Now it’s time to put everything together. Tie the strings with the shells to the wooden or metal ring, spacing them out evenly. Make sure the shells are at different heights so they can move freely in the wind.
Step 5: Add the Clapper
Finally, attach the clapper to the bottom of the ring. This is the piece that will hit the shells and create sound. You can use a small wooden bead, a piece of driftwood, or even another shell. Just make sure it’s lightweight and can move freely.
And there you have it—your very own seashell wind chime! Hang it up outside and let the wind do its magic.
Customizing Your Wind Chime
One of the best things about making your own wind chime is that you can customize it to your heart’s content. Here are a few ideas to take your project to the next level:
- Paint Your Shells: Add a pop of color by painting your shells with acrylic paint. You can go for a uniform look or mix and match patterns.
- Use Beads: Incorporate colorful beads into your design for added flair.
- Experiment with Shapes: Try using different types of shells, like conch shells or clamshells, for a more varied sound.
- Add Charms: Hang small charms or trinkets along with the shells for a personalized touch.
The possibilities are endless! Get creative and make your wind chime truly unique.
Tips for Success
Before you dive headfirst into your DIY wind chime adventure, here are a few tips to ensure success:
Tip 1: Choose the Right Shells
Not all shells are created equal. Look for shells that are sturdy and have a natural hole or groove where you can attach the string. Avoid fragile or cracked shells, as they may break during the process.
Tip 2: Balance Your Wind Chime
Make sure your wind chime is balanced by spacing out the shells evenly. If one side is too heavy, it won’t move properly in the wind.
Tip 3: Test the Sound
Once your wind chime is assembled, give it a test run. Gently shake it to see how the shells sound when they collide. Adjust the placement of the shells if necessary to achieve the desired sound.
Where to Hang Your Wind Chime
Now that you’ve made your wind chime, where should you hang it? The answer depends on your personal preference, but here are a few ideas:
- Backyard: Hang your wind chime near a patio or garden for a relaxing outdoor atmosphere.
- Porch: Place it on your front or back porch for a welcoming touch.
- Window: Hang it in front of a window to catch the breeze and add a decorative element to your home.
- Deck: If you have a deck, this is the perfect spot for your wind chime to shine.
Just make sure the location you choose gets enough wind to keep your chime moving and making music!
Maintaining Your Wind Chime
Like any outdoor decoration, your wind chime will need a little TLC to keep it looking (and sounding) great. Here’s how to maintain it:
- Regular Cleaning: Wipe down your wind chime occasionally with a damp cloth to remove dust and dirt.
- Check for Damage: Inspect the strings and knots regularly to ensure they’re still secure. Replace any that look worn or frayed.
- Protect from Weather: If you live in an area with harsh weather, consider bringing your wind chime indoors during storms or extreme temperatures.
With a little care, your wind chime will last for years to come.
Conclusion
Well, there you have it—everything you need to know about how to make a wind chime with seashells. From gathering materials to hanging your finished product, this DIY project is a breeze (pun intended!). Not only is it a great way to express your creativity, but it also adds a peaceful, beachy vibe to your home.
So what are you waiting for? Grab those shells and get crafting! And when you’re done, don’t forget to share your masterpiece with the world. Post a pic on social media, leave a comment below, or tell your friends about your new hobby. Who knows? You might inspire someone else to give it a try.
Happy crafting, and may the wind always carry sweet melodies to your ears!
Table of Contents