Ever noticed those pesky bubbles on your car's window tint? Don’t sweat it! Fixing bubbled window tint isn’t as hard as you think, and we’ve got all the tricks to help you out. Whether it’s due to poor installation or just plain old wear and tear, those bubbles can ruin the sleek look of your ride. But hey, let’s dive right in and figure out how to tackle this issue once and for all.
Window tint is more than just a stylish upgrade; it offers protection from UV rays, keeps your car cooler, and adds a touch of privacy. However, when bubbles start to form, it can be a bit of an eyesore. Lucky for you, this guide will walk you through the process of fixing bubbled window tint like a pro. No need to shell out big bucks for professional services when you can handle it yourself.
Before we get into the nitty-gritty, it’s important to understand why bubbles form in the first place. Moisture trapped between the tint film and the glass is usually the culprit, but don’t worry—there are several ways to address this issue. Let’s take a deep breath and explore the step-by-step process of how to fix bubbled window tint without losing your cool.
Understanding the Problem: Why Does Window Tint Bubble?
First things first, let’s talk about why window tint bubbles in the first place. It’s not rocket science, but knowing the cause can help you prevent it from happening again in the future. Here’s the deal:
- Improper installation can leave air pockets trapped underneath the tint film.
- Moisture seeping in over time can cause bubbles to form, especially if the edges of the tint aren’t sealed properly.
- Low-quality window tint materials are more prone to bubbling because they don’t adhere as well to the glass.
- Exposure to extreme weather conditions, like intense heat or cold, can weaken the adhesive and lead to bubbling.
Now that we’ve got the causes down, let’s move on to the good stuff—how to fix bubbled window tint. Trust me, it’s not as complicated as it sounds, and with the right tools, you’ll have your windows looking as good as new in no time.
What You’ll Need to Fix Bubbled Window Tint
Before you dive into the process, it’s important to gather all the necessary tools and materials. Having everything ready will make the job smoother and more efficient. Here’s a quick list of what you’ll need:
- A sharp utility knife or razor blade
- A lint-free microfiber cloth
- Isopropyl alcohol (at least 90%)
- A spray bottle filled with distilled water
- A plastic squeegee
- A hairdryer or heat gun (optional)
These items are pretty easy to find, and most of them might already be lying around your house. Once you’ve got everything ready, it’s time to roll up your sleeves and get to work.
Step-by-Step Guide: How to Fix Bubbled Window Tint
Step 1: Clean the Window Thoroughly
The first step in fixing bubbled window tint is to clean the affected area. You want to make sure there’s no dirt or debris that could interfere with the process. Grab your microfiber cloth and spray some distilled water on it. Gently wipe the window, making sure to remove any dust or grime.
Pro tip: Use isopropyl alcohol to clean the edges of the tint. This will help ensure a clean surface and reduce the risk of moisture seeping back in.
Step 2: Locate and Assess the Bubbles
Take a close look at the bubbles and figure out how bad the damage is. Are they small and scattered, or is there one big bubble? This will help you decide how to approach the repair. If the bubbles are small, you might be able to get away with just popping them. If they’re larger, you might need to remove a section of the tint.
Remember, patience is key here. Rushing the process could lead to more damage, so take your time and assess the situation carefully.
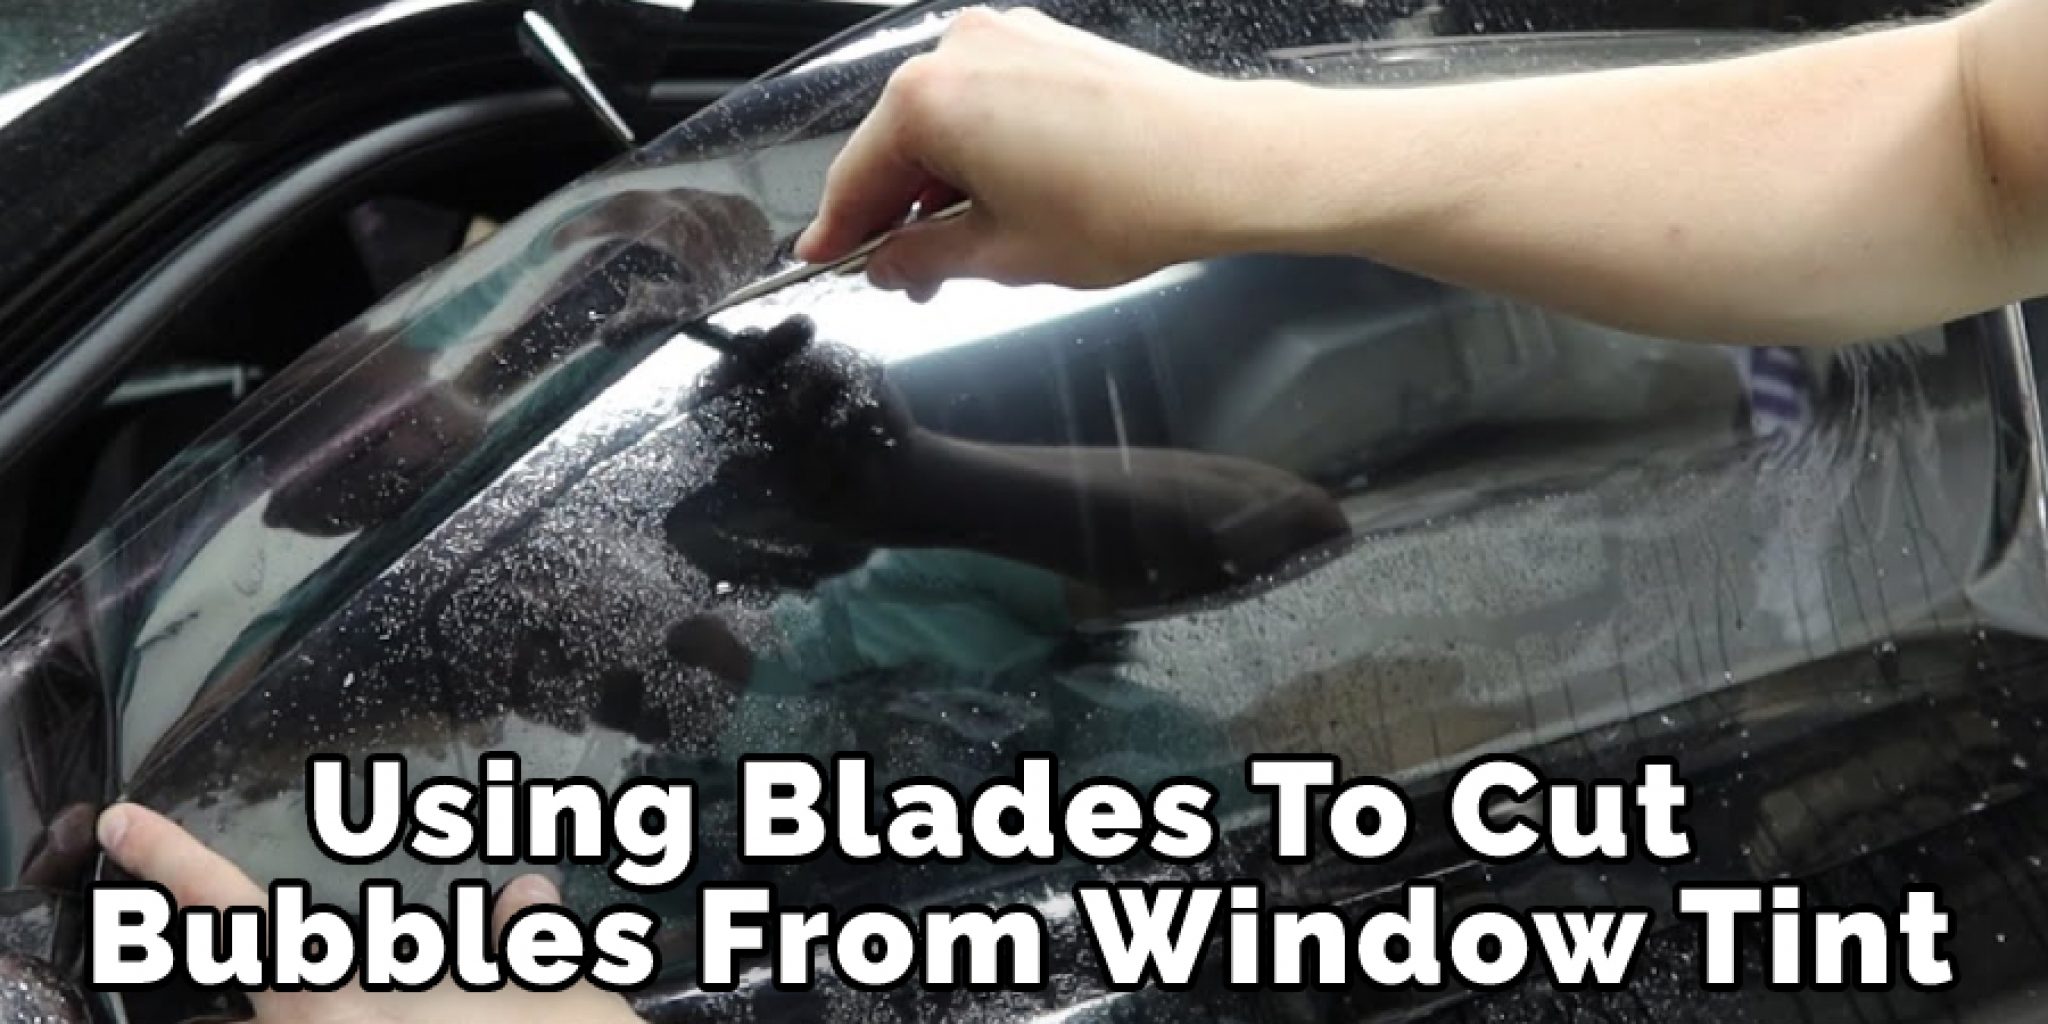
Step 3: Pop the Bubbles
Using a sharp utility knife or razor blade, carefully puncture the bubbles. Be gentle—this isn’t a game of Operation, but you don’t want to accidentally tear the tint either. Once you’ve popped the bubbles, use the plastic squeegee to gently push out any trapped air or moisture.
Don’t worry if it feels a bit messy at first. As long as you’re careful, you’ll be able to smooth things out in the next step.
Step 4: Apply Heat (If Necessary)
For stubborn bubbles that won’t go away, you might need to apply some heat. Use a hairdryer or heat gun to gently warm the affected area. This will help loosen the adhesive and make it easier to smooth out the tint. Just be careful not to overheat the tint, as this can cause it to warp or peel off completely.
Once the area is warm, use the squeegee again to flatten the tint and remove any remaining bubbles. It’s like giving your window a mini spa treatment!
Step 5: Re-Seal the Edges
To prevent future bubbles, it’s important to re-seal the edges of the tint. Use your utility knife to trim any excess material, and then apply a small amount of adhesive around the edges. This will help keep moisture out and ensure a long-lasting repair.
Give the tint a final wipe with a clean microfiber cloth to remove any fingerprints or smudges, and voilà! Your window should look as good as new.
Preventative Measures: How to Keep Your Window Tint Bubble-Free
Now that you’ve fixed the bubbled window tint, let’s talk about how to keep it from happening again. Prevention is always better than cure, and with a few simple steps, you can ensure your tint stays in top condition for years to come.
- Regularly clean your windows to prevent dirt and debris from accumulating.
- Check the edges of the tint periodically to make sure they’re sealed properly.
- Avoid parking your car in direct sunlight for extended periods, especially during hot summer months.
- Consider investing in higher-quality tint materials if you’re planning to re-tint your windows in the future.
By following these tips, you’ll be able to enjoy bubble-free windows and keep your car looking sharp.
When to Call in the Professionals
While fixing bubbled window tint yourself can save you money, there are times when it’s best to call in the professionals. If the damage is extensive or if you’re dealing with multiple windows, it might be worth it to let the experts handle it. They have the tools and experience to ensure a flawless repair.
Plus, professional installers often offer warranties on their work, so if anything goes wrong down the line, you won’t have to worry about footing the bill. It’s a win-win situation!
Cost Comparison: DIY vs Professional Services
Let’s break down the costs involved in fixing bubbled window tint. On the DIY side, you’ll need to factor in the cost of tools and materials, which can range from $10 to $50 depending on what you already have on hand. If you’re handy and have some spare time, this can be a great way to save money.
On the other hand, professional services can cost anywhere from $100 to $300 per window, depending on the extent of the damage and the quality of the tint being used. While it’s more expensive upfront, you’ll have the peace of mind knowing the job is being done by experts.
Ultimately, the choice comes down to your budget and how much time you’re willing to invest in the process.
Data and Statistics: The Importance of Window Tint
Did you know that window tint can block up to 99% of harmful UV rays? That’s a pretty impressive statistic, and it highlights just how important window tint is for protecting both you and your car. In addition to UV protection, tinted windows can reduce heat buildup by up to 70%, keeping your car cooler and more comfortable during those scorching summer months.
According to a study by the National Fenestration Rating Council, vehicles with properly installed window tint experience less interior fading and damage. This means your car’s interior will look newer for longer, adding value to your investment.
Common Mistakes to Avoid When Fixing Window Tint
Even the best of us make mistakes, but when it comes to fixing bubbled window tint, there are a few common errors to watch out for. Here are a few things to avoid:
- Rushing the process—take your time and assess the situation carefully.
- Using too much force when popping bubbles, which can lead to tears in the tint.
- Skipping the re-sealing step, which can cause moisture to seep back in.
- Not cleaning the window thoroughly before starting the repair.
By avoiding these mistakes, you’ll be able to achieve a professional-looking repair every time.
Final Thoughts: How to Fix Bubbled Window Tint
Fixing bubbled window tint might seem intimidating at first, but with the right tools and a bit of patience, it’s a job you can definitely tackle yourself. From understanding the causes of bubbling to mastering the step-by-step process, this guide has equipped you with all the knowledge you need to get the job done right.
Remember, prevention is key. Regular maintenance and proper care can go a long way in extending the life of your window tint and keeping it looking great. So, whether you choose to DIY or call in the professionals, make sure to prioritize the quality and longevity of your tint.
Now, it’s your turn! Have you ever fixed bubbled window tint before? Share your experiences and tips in the comments below. And if you found this guide helpful, don’t forget to share it with your friends and family. Together, let’s keep those windows looking sharp and bubble-free!
Table of Contents
- How to Fix Bubbled Window Tint Like a Pro
- Understanding the Problem: Why Does Window Tint Bubble?
- What You’ll Need to Fix Bubbled Window Tint
- Step-by-Step Guide: How to Fix Bubbled Window Tint
- Step 1: Clean the Window Thoroughly
- Step 2: Locate and Assess the Bubbles
- Step 3: Pop the Bubbles
- Step 4: Apply Heat (If Necessary)
- Step 5: Re-Seal the Edges
- Preventative Measures: How to Keep Your Window Tint Bubble-Free
- When to Call in the Professionals
- Cost Comparison: DIY vs Professional Services
- Data and Statistics: The Importance of Window Tint
- Common Mistakes to Avoid When Fixing Window Tint
- Final Thoughts: How to Fix Bubbled Window Tint