Learning how to draw a rose and a heart is like unlocking a superpower that lets you express love, creativity, and beauty in one stroke. Whether you're an amateur artist or just looking to doodle something meaningful, this guide will take you through easy steps to create stunning roses and hearts. Don’t worry if you think you’re not “good at art”—we’ve got your back! By the end of this, you’ll be sketching these iconic symbols like a pro.
Drawing a rose and a heart might seem intimidating at first, but trust me, it’s simpler than you think. This guide isn’t just about teaching you how to draw; it’s about giving you the confidence to let your creativity flow. You don’t need expensive materials or years of practice—just a pencil, paper, and the willingness to try.
So, grab your favorite drawing tools, find a comfy spot, and let’s dive into the world of roses and hearts. Who knows? You might discover a hidden talent or create something that sparks joy for yourself or someone else.
Why Learn How to Draw a Rose and a Heart?
Before we get into the nitty-gritty of drawing, let’s talk about why roses and hearts hold such a special place in art and culture. Roses symbolize love, passion, and beauty, while hearts represent affection and connection. Combining these two elements in your artwork can add depth and meaning to any piece.
Not only are they visually appealing, but learning how to draw them can also boost your confidence and improve your artistic skills. Plus, it’s a great way to relax and unwind after a long day. So, whether you’re creating a gift for someone special or simply want to enhance your skills, this guide will help you achieve your goals.
What You’ll Need to Get Started
Before we dive into the drawing process, let’s talk about the tools you’ll need. Don’t worry—you don’t have to break the bank to get started. Here’s a quick list of essentials:
- A pencil (HB or 2B works great)
- An eraser (a soft kneaded eraser is ideal)
- A ruler (optional, but helpful for straight lines)
- A sheet of paper (any type will do)
- Colored pencils or markers (if you want to add color)
That’s it! No fancy art supplies needed. The focus here is on mastering the basics and building your skills step by step.
Understanding the Basics of Drawing
If you’re new to drawing, it’s important to understand some basic principles. Drawing is all about breaking down complex shapes into simpler ones. For example, a rose can be thought of as a series of circles and curves, while a heart is essentially two circles connected by a V-shape.
Here are a few tips to keep in mind:
- Start with light, gentle strokes so you can easily erase mistakes.
- Don’t be afraid to make mistakes—they’re part of the learning process.
- Practice regularly to improve your skills over time.
With these basics in mind, let’s move on to the step-by-step process of drawing a rose and a heart.
Step-by-Step Guide: How to Draw a Heart
Let’s start with the heart, as it’s usually easier for beginners. Follow these simple steps:
Step 1: Draw Two Circles
Begin by drawing two overlapping circles. These will form the top part of the heart. Make sure the circles are roughly the same size and positioned close together.
Step 2: Add a V-Shape
Now, draw a V-shape connecting the bottom of the two circles. This will create the bottom point of the heart.
Step 3: Smooth Out the Edges
Once you’ve got the basic shape, smooth out the edges to make the heart look more polished. Erase any unnecessary lines and refine the curves.
Step 4: Add Details
To make your heart stand out, you can add details like shading or patterns. Use a darker pencil to add depth and texture.
And there you have it—a beautiful heart! Now, let’s move on to the rose.
Step-by-Step Guide: How to Draw a Rose
Drawing a rose might seem tricky, but with the right approach, it’s easier than you think. Follow these steps:
Step 1: Draw a Circle
Start by drawing a small circle in the center of your paper. This will be the base of the rose.
Step 2: Add Petals
Next, draw several curved lines around the circle to form the petals. Think of each petal as a teardrop shape. Layer them on top of each other to create a realistic look.
Step 3: Draw the Stem
Now, draw a straight line extending downward from the base of the rose. This will be the stem. Add a few curves to make it look more natural.
Step 4: Add Leaves
To complete your rose, draw a few leaves on either side of the stem. Use simple teardrop shapes for the leaves and add veins for extra detail.
Step 5: Refine Your Drawing
Once you’ve got the basic structure, go over your lines to make them smoother and more defined. Erase any extra lines and add shading to give your rose depth and dimension.
Voilà! You’ve just drawn a beautiful rose. Now, let’s combine the two elements.
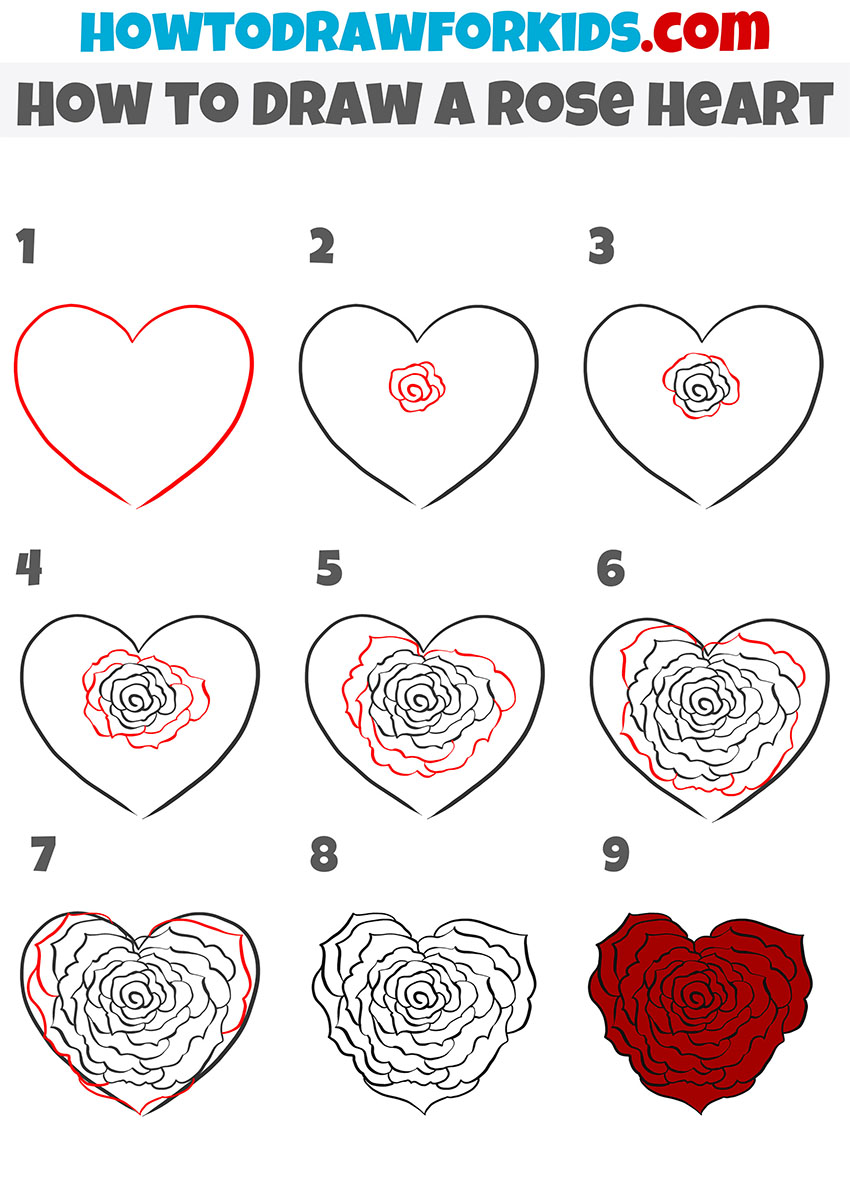
Combining a Rose and a Heart
Now that you know how to draw both a rose and a heart, let’s see how you can combine them. One popular way is to draw a heart with a rose in the center. Here’s how:
- Draw a heart using the steps above.
- In the center of the heart, draw a small rose.
- Add details like shading and patterns to tie the two elements together.
This creates a stunning piece of art that’s perfect for gifts or personal projects. The possibilities are endless!
Tips for Improving Your Drawing Skills
Now that you’ve learned the basics, here are a few tips to help you improve your drawing skills:
- Practice regularly—even 10 minutes a day can make a big difference.
- Study real-life examples to understand proportions and details.
- Experiment with different techniques and styles to find what works best for you.
- Don’t be afraid to make mistakes—they’re part of the learning process.
Remember, drawing is a skill that improves with time and practice. Keep pushing yourself, and you’ll be amazed at how far you can go.
Common Mistakes to Avoid
As with any new skill, there are a few common mistakes to watch out for when learning how to draw a rose and a heart:
- Pressing too hard with your pencil, making it difficult to erase mistakes.
- Not breaking down complex shapes into simpler ones.
- Rushing through the process—take your time to ensure accuracy.
Avoiding these mistakes will help you create more polished and professional-looking drawings.
Where to Find Inspiration
If you’re looking for inspiration, there are plenty of resources available:
- Online tutorials and videos can provide step-by-step guidance.
- Art books and magazines offer a wealth of knowledge and inspiration.
- Visiting art galleries or museums can expose you to different styles and techniques.
Don’t be afraid to experiment and try new things. The more you explore, the more you’ll grow as an artist.
Conclusion: Keep Practicing and Have Fun
Learning how to draw a rose and a heart is a rewarding experience that can bring joy to both you and others. By following the steps in this guide, you’ve taken the first step toward mastering these iconic symbols. Remember, practice makes perfect, so keep honing your skills and having fun along the way.
We’d love to hear from you! Share your drawings in the comments below or tag us on social media so we can see your progress. And don’t forget to check out our other guides for more tips and tricks to improve your artistic journey.
Table of Contents
- Why Learn How to Draw a Rose and a Heart?
- What You’ll Need to Get Started
- Understanding the Basics of Drawing
- Step-by-Step Guide: How to Draw a Heart
- Step-by-Step Guide: How to Draw a Rose
- Combining a Rose and a Heart
- Tips for Improving Your Drawing Skills
- Common Mistakes to Avoid
- Where to Find Inspiration
- Conclusion: Keep Practicing and Have Fun
Happy drawing, and remember—art is all about expressing yourself. So go ahead and let your creativity shine!