Ever wondered how to draw samurai swords that look authentic and breathtaking? Well, you're in the right place! Drawing a samurai sword, or katana, might seem intimidating at first, but with the right techniques and a little practice, you can create stunning artworks that capture the essence of these legendary weapons. In this article, we'll break down the process step by step, ensuring even beginners can master the art of sketching samurai swords.
Samurai swords have captivated people for centuries, symbolizing strength, honor, and craftsmanship. Whether you're an aspiring artist or just someone who loves Japanese culture, learning how to draw samurai swords is a skill worth acquiring. It's not just about creating a cool drawing—it's about understanding the history and design behind one of the most iconic weapons in history.
Don't worry if you're new to drawing! We've got you covered. This guide will take you through every detail, from the basic shapes to the intricate details that make a samurai sword look realistic. So grab your pencil, and let's dive in!
Here’s what we’ll cover in this article:
- The History Behind Samurai Swords
- Tools You’ll Need to Get Started
- Understanding the Basics of a Samurai Sword
- Step-by-Step Guide on How to Draw a Samurai Sword
- Adding Details to Your Drawing
- Pro Tips for Making Your Sword Look Realistic
- Exploring Different Styles of Samurai Swords
- Common Mistakes to Avoid
- Practicing and Improving Your Skills
- Final Thoughts and Next Steps
The History Behind Samurai Swords
Before we jump into the drawing process, it’s important to understand the rich history behind samurai swords. These weapons weren’t just tools of war—they were symbols of status, honor, and craftsmanship. The katana, wakizashi, and tanto are all types of samurai swords, each with its own unique purpose and design.
Samurai swords have been around since the 10th century, evolving over time to become the sleek, curved blades we know today. The process of making a katana is an art form in itself, involving layers of steel folded hundreds of times to create a blade that’s both strong and flexible.
Why Learn About the History?
Knowing the history helps you appreciate the intricacies of the design. For instance, the curve of the blade isn’t random—it’s a result of the forging process and the way samurai wielded their swords. Understanding these details will make your drawings more authentic and meaningful.
Tools You’ll Need to Get Started
You don’t need fancy tools to start drawing samurai swords. In fact, you can create amazing artwork with just a few basic supplies:
- Pencils (HB, 2B, 4B for shading)
- Eraser (a kneaded eraser works wonders)
- Sketchbook or drawing paper
- Reference images (optional but highly recommended)
- Colored pencils or markers if you want to add color
Some artists prefer using digital tools like tablets and software, but for beginners, sticking to traditional methods is often the best way to learn the fundamentals.
Understanding the Basics of a Samurai Sword
Before you start drawing, it’s crucial to familiarize yourself with the anatomy of a samurai sword. Here’s a quick breakdown:
- Blade: The curved, sharp part of the sword.
- Guard (Tsuba): A decorative piece that protects the hand.
- Hilt (Tsuka): The handle, often wrapped in ray skin and silk cord.
- Pommel (Kashira): The end of the hilt.
- Scabbard (Saya): The protective sheath for the blade.
Each component plays a role in the overall design, so pay attention to proportions and details when sketching.
Step-by-Step Guide on How to Draw a Samurai Sword
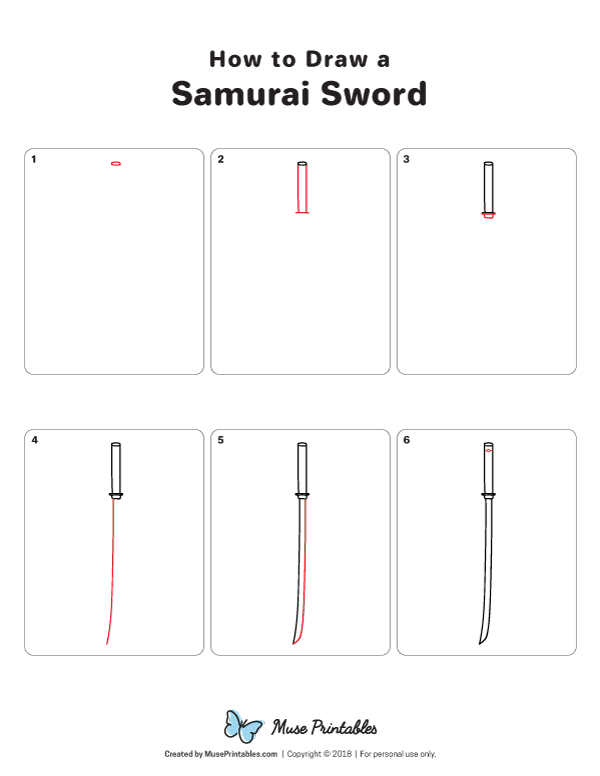
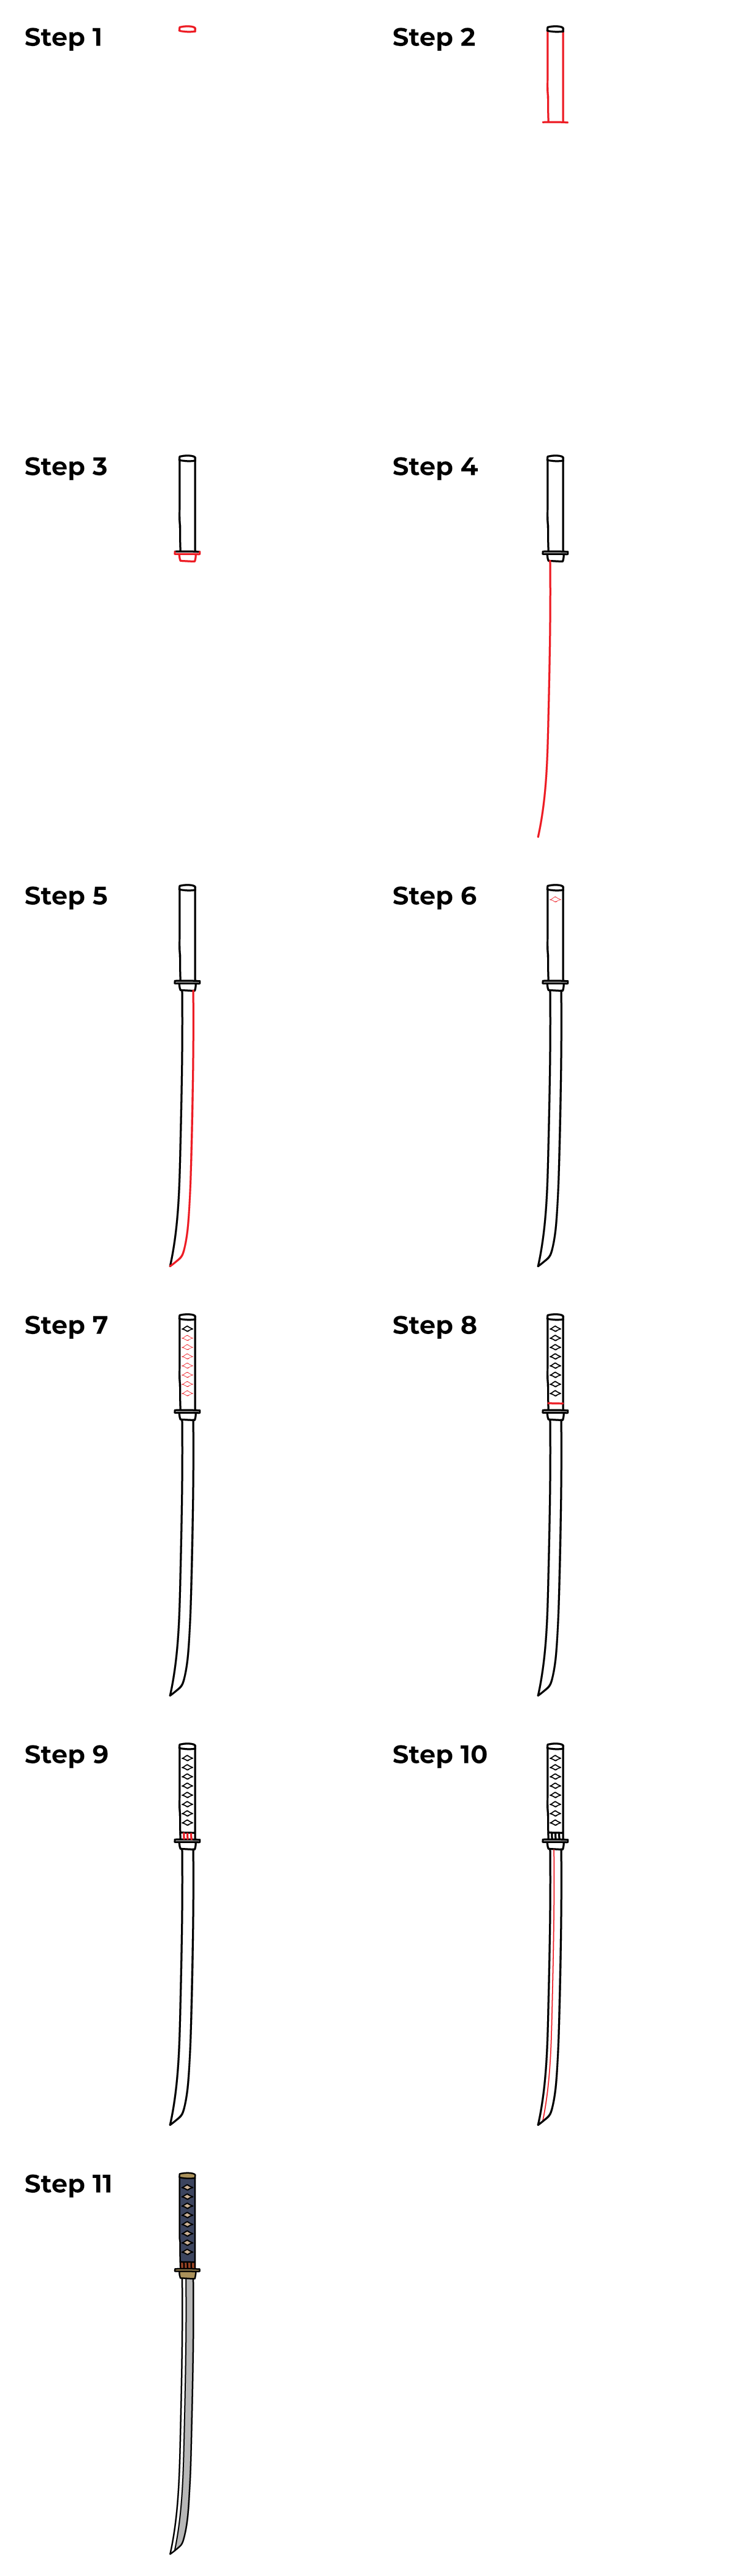
Now that you have a good understanding of the basics, let’s dive into the step-by-step process of drawing a samurai sword:
Step 1: Sketch the Basic Shape
Start by drawing a long, curved line to represent the blade. Keep it simple at this stage—no need to add details yet. Think of it as the skeleton of your drawing.
Step 2: Add the Hilt and Guard
Below the blade, draw a rectangle for the hilt and a circular or oval shape for the guard. These don’t have to be perfect—they’ll be refined later.
Step 3: Refine the Blade
Now it’s time to give your blade some character. Add a sharper edge and refine the curve. You can also sketch in the ridges that run along the blade for added realism.
Step 4: Detail the Hilt
Wrap the hilt with lines to simulate the silk cord. Don’t forget to add the pommel at the bottom for balance.
Step 5: Finalize the Guard
Decorate the guard with patterns or designs. This is where you can let your creativity shine. Some guards are simple, while others are incredibly intricate.
Adding Details to Your Drawing
Once the basic structure is in place, it’s time to add those all-important details. Here are a few tips:
- Shading: Use cross-hatching or stippling techniques to add depth and dimension.
- Texture: Pay attention to the texture of the hilt and scabbard. Ray skin, for example, has a distinct look that can be replicated with careful shading.
- Reflections: Don’t forget to add reflections on the blade to make it look shiny and realistic.
Take your time with this step. The more details you add, the more impressive your drawing will be.
Pro Tips for Making Your Sword Look Realistic
Here are some expert tips to take your samurai sword drawings to the next level:
- Study real swords: Look at photos or visit museums to see how actual samurai swords are made.
- Practice proportions: Make sure the blade, hilt, and guard are in proportion to each other.
- Experiment with angles: Try drawing the sword from different perspectives to challenge yourself.
Remember, practice makes perfect. The more you draw, the better you’ll get.
Exploring Different Styles of Samurai Swords
Samurai swords come in various styles, each with its own unique features. Here are a few to explore:
- Katana: The most famous type, known for its long blade.
- Wakizashi: A shorter companion sword often worn with the katana.
- Tanto: A small dagger-like sword used for close combat.
Experiment with drawing different types to expand your skills and knowledge.
Common Mistakes to Avoid
Even the best artists make mistakes. Here are a few pitfalls to watch out for:
- Ignoring proportions: A katana that’s too short or a guard that’s too large will look off.
- Overcomplicating details: While details are important, too much can make your drawing look cluttered.
- Forgetting reflections: A blade without reflections won’t look realistic.
Stay mindful of these mistakes, and you’ll be on your way to creating beautiful samurai sword drawings in no time.
Practicing and Improving Your Skills
Like any skill, drawing samurai swords takes practice. Here are a few exercises to help you improve:
- Draw daily: Even if it’s just for 10 minutes, regular practice will make a huge difference.
- Challenge yourself: Try new styles, angles, and techniques to keep things interesting.
- Seek feedback: Share your work with others and ask for constructive criticism.
Remember, every great artist started as a beginner. Keep pushing yourself, and you’ll see progress over time.
Final Thoughts and Next Steps
Learning how to draw samurai swords is a rewarding journey that combines art, history, and culture. By following the steps outlined in this guide, you can create stunning drawings that capture the essence of these legendary weapons.
So what are you waiting for? Grab your pencil and start practicing today! And don’t forget to share your creations with the world. Who knows? You might just inspire someone else to pick up a pencil and join you on this artistic adventure.
Thanks for reading, and happy drawing!