Let’s be real, tying a bow on the back of a dress can feel like one of those adulting challenges that’s harder than it looks. But don’t sweat it! Whether you’re rocking a fancy party dress or just trying to nail that perfect bow for a special occasion, this guide is here to save your day. How to tie a dress bow in the back? We’ve got all the tricks, tips, and secrets you need to master this skill in no time.
Picture this: you’re getting ready for a big event, and your dress has a beautiful bow detail at the back. Sounds glamorous, right? But when you try to tie it yourself, it feels like a tangled mess. Fear not, because we’ve got your back—literally! This article will break down the process step by step so you can look flawless without any stress.
Whether you’re a DIY enthusiast or just someone who wants to avoid awkward moments in front of the mirror, this guide will teach you everything you need to know about tying a dress bow in the back. So grab your favorite dress, and let’s dive in!
Why Learning How to Tie a Dress Bow in the Back Matters
First things first, why should you even bother learning how to tie a dress bow in the back? Well, it’s not just about convenience—it’s about confidence. Imagine walking into a room knowing that your dress is perfectly tied and looks as good as it did in the store. That’s empowerment, my friend!
Plus, mastering this skill means you won’t have to rely on someone else to help you out every time. You’ll save time, avoid awkward moments, and feel like a total pro. And let’s be honest, who doesn’t love feeling like a queen?
So, if you’re ready to upgrade your dressing game, keep reading. We’ve got some game-changing tips that will make this process a breeze.
Tools You’ll Need to Get Started
Before we jump into the nitty-gritty of how to tie a dress bow in the back, let’s talk about what you’ll need. The good news is, you don’t need any fancy tools—just a few simple things:
- Your dress with the bow detail
- A full-length mirror (optional but super helpful)
- A hair tie or bobby pins (in case you need to hold your hair out of the way)
- A friend (if you’re feeling extra adventurous, you can do it solo!)
Having these items on hand will make the process smoother and more enjoyable. Trust me, nothing ruins a good vibe like struggling to see what you’re doing.
Step-by-Step Guide to Tying a Dress Bow in the Back
Alright, let’s get down to business. Here’s a step-by-step breakdown of how to tie a dress bow in the back like a pro:
Step 1: Start with the Basics
Begin by putting on your dress and ensuring everything fits comfortably. Make sure the bow straps are long enough to tie easily. If they’re too short, you might need to adjust them or consider a different dress. No drama allowed here!
Step 2: Gather the Ends
Reach back and grab both ends of the bow. If you’re doing this alone, it might feel a bit tricky, but don’t worry—you’ve got this. Hold one end in each hand and pull them taut so there’s no slack.
Step 3: Create a Loop
Take one of the ends and create a small loop. This will be the first part of your bow. Hold it securely with one hand while keeping the other end taut.
Step 4: Cross Over
Now, take the other end and wrap it around the loop you just created. This is where the magic starts to happen. Keep it tight but not too tight—you don’t want to ruin the fabric.
Step 5: Add Another Loop
Take the end you just wrapped around and create another loop. This will be the second part of your bow. Hold both loops securely while keeping the rest of the material taut.
Step 6: Tie It Off
Wrap the remaining end around the middle of both loops and pull it through to secure the bow. Tighten everything gently to ensure it stays in place. Voilà! You’ve got yourself a beautiful bow.
Pro tip: If you’re struggling to see what you’re doing, use a full-length mirror or ask a friend for help. Sometimes an extra set of hands can make all the difference.
Common Mistakes to Avoid
Now that you know the steps, let’s talk about some common mistakes to avoid. These little hiccups can make or break your bow-tying experience:
- Not pulling the loops evenly: This can make your bow look lopsided. Take your time and ensure both sides are balanced.
- Tying too tightly: While you want your bow to stay in place, you don’t want to damage the fabric. Be gentle!
- Forgetting to double-check: Always give your bow a quick look-over to make sure everything is secure and looking good.
By avoiding these mistakes, you’ll be able to achieve a flawless bow every time.
Tips for Solo Bow-Tying
Tying a dress bow in the back by yourself can feel like a challenge, but it’s definitely doable. Here are some tips to make it easier:
- Use a mirror: A full-length mirror is your best friend in this situation. It will help you see what you’re doing and ensure everything is aligned.
- Practice beforehand: If you know you’ll be wearing a dress with a bow, practice tying it at home. This will give you confidence when it’s time to get dressed.
- Wear your hair up: If your hair is long, it can get in the way. Pull it back with a hair tie or bobby pins to keep it out of your face.
Remember, practice makes perfect. The more you do it, the easier it will become.
How to Adjust Your Bow for Different Styles
Not all bows are created equal. Depending on the style of your dress, you might need to adjust your bow to fit the look. Here are a few tips for different styles:
Formal Dresses
For formal dresses, keep your bow neat and symmetrical. This will give you a polished, elegant look that’s perfect for any high-end event.
Casual Dresses
If you’re wearing a casual dress, feel free to let your bow be a little more relaxed. You can even leave the loops slightly uneven for a playful touch.
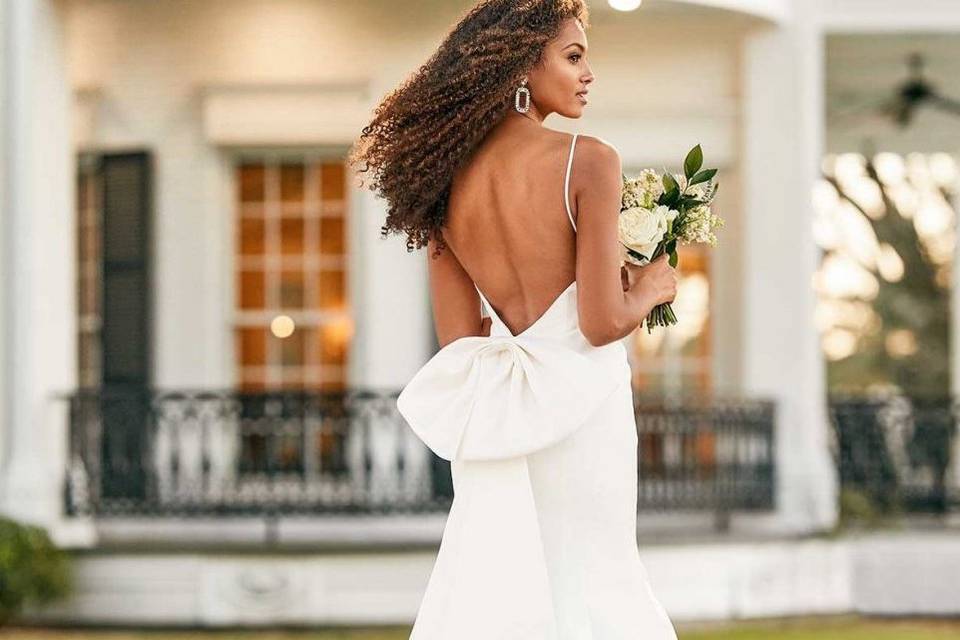
Wedding Dresses
For wedding dresses, precision is key. Make sure your bow is perfectly tied and secured so it stays in place throughout the ceremony.
No matter what style you’re going for, the most important thing is to feel confident and comfortable in your own skin.
Expert Advice for Perfecting Your Bow
To take your bow-tying skills to the next level, here are some expert tips from professionals in the fashion industry:
- Use a fabric grip: If you’re worried about your bow slipping, try using a fabric grip to keep it in place.
- Experiment with textures: Different fabrics can affect how your bow looks and feels. Play around with different textures to find what works best for you.
- Don’t be afraid to ask for help: Even the pros sometimes need a helping hand. There’s no shame in asking a friend or family member to lend a hand.
By incorporating these tips into your routine, you’ll be able to create bows that look professional and polished every time.
Conclusion: Tie Your Bow with Confidence
So there you have it, folks! Tying a dress bow in the back doesn’t have to be a daunting task. With a little practice and the right techniques, you can master this skill in no time. Remember, confidence is key, and looking good is all about feeling good.
Now that you know how to tie a dress bow in the back, it’s time to put your new skills to the test. Try it out on your next dress and see how amazing you look. And don’t forget to share your success with us in the comments below!
Until next time, stay stylish and keep rocking those bows!
Table of Contents
- Why Learning How to Tie a Dress Bow in the Back Matters
- Tools You’ll Need to Get Started
- Step-by-Step Guide to Tying a Dress Bow in the Back
- Common Mistakes to Avoid
- Tips for Solo Bow-Tying
- How to Adjust Your Bow for Different Styles
- Expert Advice for Perfecting Your Bow
- Conclusion: Tie Your Bow with Confidence