Ever wondered how to make a homemade hair removal cream that’s safe, effective, and budget-friendly? Well, you're not alone. Millions of people are turning to DIY solutions for their beauty needs, and hair removal is no exception. With the right ingredients and a bit of know-how, you can whip up a homemade cream that rivals store-bought options without the harsh chemicals or hefty price tag.
Let’s be real, store-bought hair removal creams can be a nightmare. They’re often packed with synthetic chemicals that can irritate your skin, and they don’t always deliver the results you’re hoping for. Plus, who wants to keep spending money on something you can make at home with ingredients you probably already have in your pantry?
So, buckle up because we’re about to dive deep into the world of homemade hair removal creams. From choosing the right ingredients to perfecting the recipe, this article has got you covered. By the end of it, you’ll be ready to rock smooth, hair-free skin without breaking the bank or exposing yourself to harmful chemicals.
Why Make a Homemade Hair Removal Cream?
Before we get into the nitty-gritty of making your own cream, let’s talk about why it’s such a great idea. First off, store-bought creams can be expensive, and they often come with a long list of scary ingredients that you can’t even pronounce. Making your own cream means you’re in control of what goes into it, ensuring it’s safe and gentle for your skin.
Plus, DIY creams are customizable. You can tweak the recipe to suit your skin type, whether you’ve got sensitive skin, dry skin, or oily skin. And let’s not forget the satisfaction of knowing you’ve created something awesome with your own two hands. It’s like giving yourself a little pat on the back every time you use it.
Key Ingredients for Your Homemade Cream
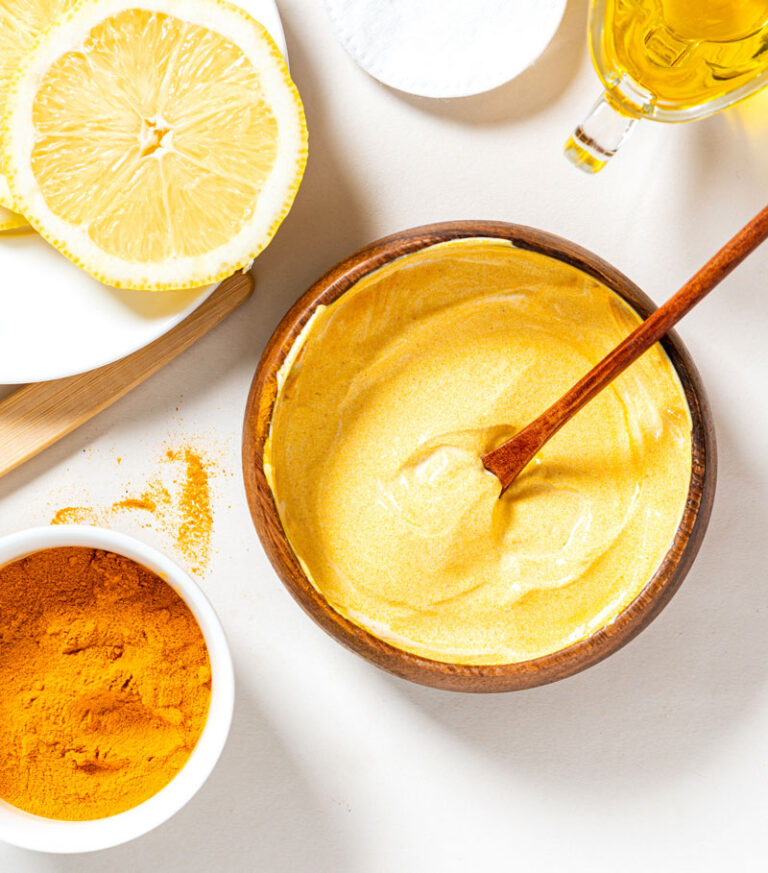
Now that we’ve established why homemade creams are the way to go, let’s talk ingredients. The key to a successful DIY cream lies in using the right stuff. Here are some must-haves:
- Lemon Juice: A natural bleaching agent that helps lighten hair and brighten your skin.
- Sugar: Acts as a natural exfoliant and helps break down hair follicles.
- Honey: Moisturizes and soothes the skin while enhancing the cream’s effectiveness.
- Baking Soda: Works wonders for exfoliation and helps neutralize any acidic components in the mixture.
- Coconut Oil: Provides hydration and helps prevent irritation.
These ingredients are not only effective but also super affordable, making them a win-win for your wallet and your skin.
Benefits of Using Natural Ingredients
Using natural ingredients in your homemade hair removal cream offers a ton of benefits. First and foremost, they’re kinder to your skin. Unlike synthetic chemicals, natural ingredients are less likely to cause irritation or allergic reactions. Plus, they often come with added perks like hydration, brightening, and anti-inflammatory properties.
Another advantage is sustainability. By using natural ingredients, you’re reducing your reliance on packaged products that contribute to environmental waste. It’s like giving the planet a little hug every time you whip up a batch of your cream.
How Natural Ingredients Enhance Skin Health
Natural ingredients don’t just remove hair; they also work wonders for your skin. For instance, honey is packed with antioxidants that help fight free radicals, while coconut oil keeps your skin soft and supple. Lemon juice can even out your skin tone, leaving you with a radiant glow. Who wouldn’t want all that from a single product?
Step-by-Step Guide to Making Your Cream
Now for the fun part – making your cream! Follow these simple steps and you’ll have a batch ready in no time:
- Gather your ingredients: lemon juice, sugar, honey, baking soda, and coconut oil.
- Mix 2 tablespoons of sugar with 1 tablespoon of lemon juice until it forms a paste.
- Add 1 tablespoon of honey and stir well.
- Include 1 teaspoon of baking soda and mix thoroughly.
- Finish by adding 1 teaspoon of coconut oil and blending until smooth.
Voila! Your homemade hair removal cream is ready to use. Apply it to your skin using circular motions, leave it on for 10-15 minutes, and rinse off with lukewarm water. Your skin will feel smoother than ever.
Tips for Application
Here are a few tips to ensure the best results:
- Do a patch test before applying the cream to a larger area to check for any adverse reactions.
- Exfoliate your skin beforehand to remove dead skin cells and enhance the cream’s effectiveness.
- Moisturize after use to keep your skin hydrated and soft.
Common Mistakes to Avoid
While making your own hair removal cream is pretty straightforward, there are a few common mistakes you’ll want to steer clear of:
- Using Too Much Lemon Juice: This can lead to skin irritation, so be sure to balance it with other ingredients.
- Skipping the Patch Test: Always test the cream on a small area first to avoid unexpected reactions.
- Leaving It On Too Long: Follow the recommended time frame to prevent over-exposure to the ingredients.
Avoiding these pitfalls will ensure a safe and effective hair removal experience.
Comparing Homemade Creams to Store-Bought Options
So, how does a homemade cream stack up against the store-bought ones? Let’s break it down:
- Cost: Homemade creams are significantly cheaper, especially if you already have the ingredients on hand.
- Ingredients: DIY creams are free from harsh chemicals, making them safer for your skin.
- Customization: You can tailor your cream to suit your specific needs, whereas store-bought options are one-size-fits-all.
It’s no contest – homemade creams come out on top in almost every category.
Why Choose DIY Over Commercial Products?
Commercial products may offer convenience, but they often come at a cost – both financially and to your skin. DIY creams provide a natural, cost-effective alternative that’s just as effective, if not more so. Plus, there’s something incredibly satisfying about creating something yourself.
Addressing Common Concerns
Some people might have concerns about the safety and effectiveness of homemade hair removal creams. Let’s address a few:
- Is it safe for all skin types? Absolutely! As long as you test it on a small patch first, it should be safe for most skin types.
- Does it work as well as commercial creams? In many cases, yes! The key is using high-quality ingredients and following the recipe closely.
- How often can I use it? It’s generally safe to use once or twice a week, depending on your skin’s sensitivity.
By addressing these concerns, you can feel confident in choosing a homemade cream for your hair removal needs.
Expert Tips for Best Results
Here are a few expert tips to help you get the most out of your homemade cream:
- Always use fresh, high-quality ingredients for the best results.
- Store any leftover cream in an airtight container in the fridge to prolong its shelf life.
- Combine the cream with other natural treatments, like aloe vera gel, for enhanced skin health.
These tips will ensure your cream works like a charm every time.
Maximizing Your Cream’s Effectiveness
To maximize the effectiveness of your cream, consider pairing it with other natural remedies. For example, applying aloe vera gel after use can soothe any potential irritation and keep your skin hydrated. It’s all about creating a holistic approach to skincare.
Conclusion
Making a homemade hair removal cream is a simple, effective, and budget-friendly solution for achieving smooth, hair-free skin. By using natural ingredients and following a few easy steps, you can create a cream that rivals commercial options without the harmful chemicals or high price tag.
So, what are you waiting for? Gather your ingredients, roll up your sleeves, and get to work. And don’t forget to share your experience in the comments below. Who knows? You might just inspire someone else to take the DIY plunge. Happy crafting, and here’s to smoother skin!
Table of Contents
- Why Make a Homemade Hair Removal Cream?
- Key Ingredients for Your Homemade Cream
- Benefits of Using Natural Ingredients
- Step-by-Step Guide to Making Your Cream
- Common Mistakes to Avoid
- Comparing Homemade Creams to Store-Bought Options
- Addressing Common Concerns
- Expert Tips for Best Results
- How Natural Ingredients Enhance Skin Health
- Maximizing Your Cream’s Effectiveness