Warzone 3 dead zone configuration has become a hot topic among gamers who want to take their gameplay to the next level. Whether you're a casual player or a competitive enthusiast, understanding how to adjust your settings can make all the difference. But let's be honest, diving into the world of game settings can feel like trying to solve a Rubik's Cube blindfolded. Don’t worry, though; we’ve got you covered.
Let’s talk about something that every Warzone 3 player needs to know: dead zone configuration. It’s not just another setting you tweak; it’s a game-changer. Imagine being able to move more smoothly, aim with precision, and feel like a pro. That’s what this guide is all about. We’re going deep into the nitty-gritty of how to optimize your settings so you can dominate the battlefield.
This article isn’t just another boring tech manual. We’re breaking down the complexities of Warzone 3 dead zone configuration in a way that’s easy to digest. Think of it as your best friend explaining how to set up your controller while you’re enjoying a bag of chips. Ready? Let’s dive in and make you the ultimate gamer you were always meant to be.
Why Dead Zone Configuration Matters in Warzone 3
Alright, let’s get down to business. Dead zone configuration might sound like some fancy gamer lingo, but it’s actually pretty straightforward. The dead zone refers to the area in the center of your controller’s analog stick that doesn’t register any movement. If it’s not set correctly, you might find yourself struggling with unwanted movements or difficulty aiming.
In Warzone 3, having the right dead zone setup can mean the difference between victory and defeat. Imagine trying to aim at an enemy from a distance, only to have your crosshair jittering all over the place. That’s where dead zone configuration comes in. By tweaking these settings, you can ensure smooth and precise movements, giving you that competitive edge.
But why does it matter so much? Well, let’s put it this way: Would you go into a battle with a broken weapon? Of course not! Your controller is your weapon in Warzone 3, and having it set up correctly is crucial for success. It’s like fine-tuning a race car before hitting the track. You want everything to be in perfect condition so you can perform at your best.
Understanding Warzone 3 Controller Settings
Before we dive into the specifics of dead zone configuration, let’s take a moment to understand the broader picture of Warzone 3 controller settings. Your controller is more than just a tool; it’s an extension of yourself in the game. Every button press, every stick movement, and every trigger pull affects your gameplay experience.
There are several settings you can adjust to enhance your performance. From sensitivity to aim assist, each option plays a role in how you interact with the game. But the dead zone stands out as one of the most critical settings. It affects how your controller responds to your inputs, ensuring that your movements are accurate and consistent.
Think of it like driving a car. If the steering wheel is too loose, you’ll have trouble controlling the vehicle. Similarly, if your dead zone is too large or too small, you’ll face challenges in controlling your character. It’s all about finding that sweet spot that works perfectly for you.
Key Controller Settings to Adjust
Here’s a quick rundown of some key settings you should consider tweaking alongside your dead zone:
- Sensitivity: Determines how responsive your controller is to movement.
- Aim Assist: Helps you lock onto enemies, but too much can feel unnatural.
- Vibration: Provides feedback for actions in the game.
- Trigger Response: Adjusts how your triggers react to pressure.
These settings work together to create a seamless gaming experience. By fine-tuning them, you can tailor your controller to fit your playstyle perfectly. It’s like customizing a pair of shoes to fit just right. You want comfort and performance, and that’s exactly what these settings offer.
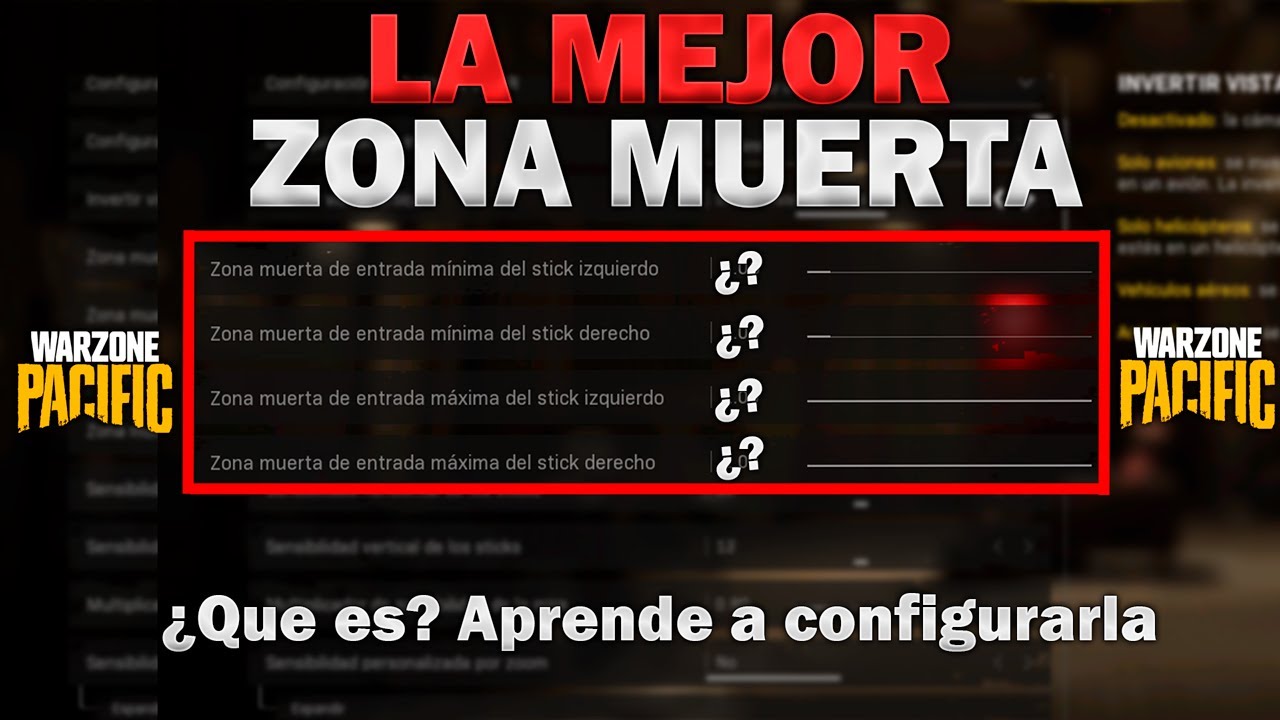
How to Access Dead Zone Settings in Warzone 3
Now that you understand why dead zone configuration is so important, let’s talk about how to access these settings in Warzone 3. Don’t worry; it’s not as complicated as it sounds. The developers have made it pretty straightforward, even for those who aren’t tech-savvy.
First, head over to the main menu and navigate to the options section. From there, you’ll find a subsection dedicated to controller settings. It’s usually labeled something like “Controls” or “Gamepad Settings.” Once you’re in there, look for the dead zone options. They might be under a heading like “Analog Stick Settings” or “Dead Zone Configuration.”
It’s worth noting that different controllers might have slightly different menus. For example, if you’re using an Xbox controller, the settings might be labeled differently compared to a PlayStation controller. But don’t let that confuse you. The basic principles remain the same across all platforms.
Step-by-Step Guide to Adjusting Dead Zones
Here’s a simple step-by-step guide to help you adjust your dead zones:
- Go to the main menu and select Options.
- Find the Controls or Gamepad Settings section.
- Locate the Analog Stick Settings or Dead Zone Configuration.
- Adjust the dead zone sliders to your desired levels.
- Test your settings in the game to ensure they feel right.
It’s important to test your settings in the game. What works on paper might not feel right in practice. Take some time to experiment and find what feels best for you. Remember, there’s no one-size-fits-all solution. What works for one player might not work for another.
Optimizing Dead Zone Settings for Different Playstyles
Not all players are created equal, and neither are their playstyles. Some gamers prefer fast, aggressive movements, while others favor slow, methodical approaches. The beauty of Warzone 3’s dead zone configuration is that it can be tailored to fit any playstyle. Let’s explore how to optimize your settings for different types of players.
For aggressive players who love rushing into battle, a smaller dead zone might be ideal. This allows for quicker movements and more responsive controls. On the other hand, players who prefer a slower, more calculated approach might benefit from a larger dead zone. It reduces unwanted movements and allows for more precise aiming.
Think of it like choosing between a sports car and an SUV. Both have their advantages, and the choice depends on what you value more. The same goes for dead zone settings. It’s all about finding the balance that suits your playstyle best.
Settings Recommendations for Various Playstyles
Here are some recommendations for different types of players:
- Aggressive Players: Set your dead zones to around 10-15% for both sticks.
- Precision Players: Aim for a dead zone of 20-25% for better aim stability.
- Balanced Players: Try a dead zone of 15-20% for a mix of speed and accuracy.
Remember, these are just starting points. Feel free to adjust them based on your personal preferences. The key is to find what works best for you and stick with it. After all, consistency is crucial in gaming, especially in competitive environments.
Common Mistakes to Avoid When Configuring Dead Zones
As with anything, there are common pitfalls to watch out for when configuring your dead zones. These mistakes can hinder your performance and make your gaming experience less enjoyable. Let’s go over some of the most common ones and how to avoid them.
One of the biggest mistakes is setting your dead zones too low. While it might seem like a good idea to have maximum sensitivity, it can lead to jittery movements and difficulty aiming. On the flip side, setting your dead zones too high can make your controller feel sluggish and unresponsive.
Another common mistake is not testing your settings in the game. Sure, they might feel fine in the menu, but how do they perform in the heat of battle? Always take the time to test your settings in different scenarios to ensure they work as intended.
Tips for Avoiding Configuration Mistakes
Here are some tips to help you avoid common configuration mistakes:
- Start with the default settings and adjust gradually.
- Test your settings in various game modes.
- Don’t be afraid to reset and start over if something feels off.
By following these tips, you can avoid the common pitfalls and set up your dead zones correctly from the start. It’s all about patience and experimentation. Remember, there’s no shame in making mistakes. What matters is learning from them and improving.
Advanced Tips for Mastering Dead Zone Configuration
For those looking to take their dead zone configuration to the next level, there are some advanced tips and tricks you can try. These might require a bit more effort, but they can significantly enhance your gaming experience.
One advanced technique is using custom profiles. Most modern controllers allow you to create and save multiple profiles with different settings. This means you can have a separate profile for different game modes or even different maps. It’s like having a personalized setup for every situation.
Another tip is to calibrate your controller regularly. Over time, controllers can develop drift or become less responsive. By calibrating them, you ensure that your settings remain accurate and effective. It’s like giving your controller a tune-up to keep it running smoothly.
Creating Custom Profiles for Different Scenarios
Here’s how you can create custom profiles:
- Go to the controller settings menu.
- Select the option to create a new profile.
- Adjust your dead zone settings to your desired levels.
- Save the profile and give it a name.
- Repeat for different scenarios or game modes.
By having multiple profiles, you can quickly switch between settings without having to adjust them manually each time. It’s like having a toolbox full of specialized tools, each designed for a specific task. This level of customization can give you a significant advantage in the game.
Real-World Examples of Successful Configurations
Let’s take a look at some real-world examples of successful dead zone configurations. These examples come from professional gamers and experienced players who have found what works best for them.
One professional player swears by a dead zone setting of 12% for both sticks. He claims it gives him the perfect balance of speed and accuracy, allowing him to dominate in both close-quarters and long-range battles. Another player prefers a slightly higher dead zone of 18%, which helps him maintain stability during intense firefights.
These examples illustrate how personal preference plays a huge role in dead zone configuration. What works for one player might not work for another. The key is to experiment and find what feels right for you. After all, the best settings are the ones that help you perform at your best.
Conclusion: Take Your Warzone 3 Gameplay to the Next Level
In conclusion, mastering your Warzone 3 dead zone configuration can significantly enhance your gameplay experience. By understanding the importance of these settings, accessing them correctly, and optimizing them for your playstyle, you can take your skills to the next level.
We’ve covered a lot of ground in this article, from the basics of dead zone settings to advanced tips and real-world examples. Remember, the key to success is experimentation and consistency. Don’t be afraid to try new things and find what works best for you. And most importantly, have fun while doing it!
Now it’s your turn. Take what you’ve learned and apply it to your own gameplay. Share your experiences in the comments below, and let us know how these tips have helped you. Don’t forget to check out our other articles for more gaming insights and strategies. Happy gaming, and may the odds be ever in your favor!
Table of Contents
- Why Dead Zone Configuration Matters in Warzone 3
- Understanding Warzone 3 Controller Settings
- How to Access Dead Zone Settings in Warzone 3
- Optimizing Dead Zone Settings for Different Playstyles
- Common Mistakes to Avoid When Configuring Dead Zones
- Advanced Tips for Mastering Dead Zone Configuration
- Real-World Examples of Successful Configurations
- Conclusion: Take Your Warzone 3 Gameplay to the Next Level