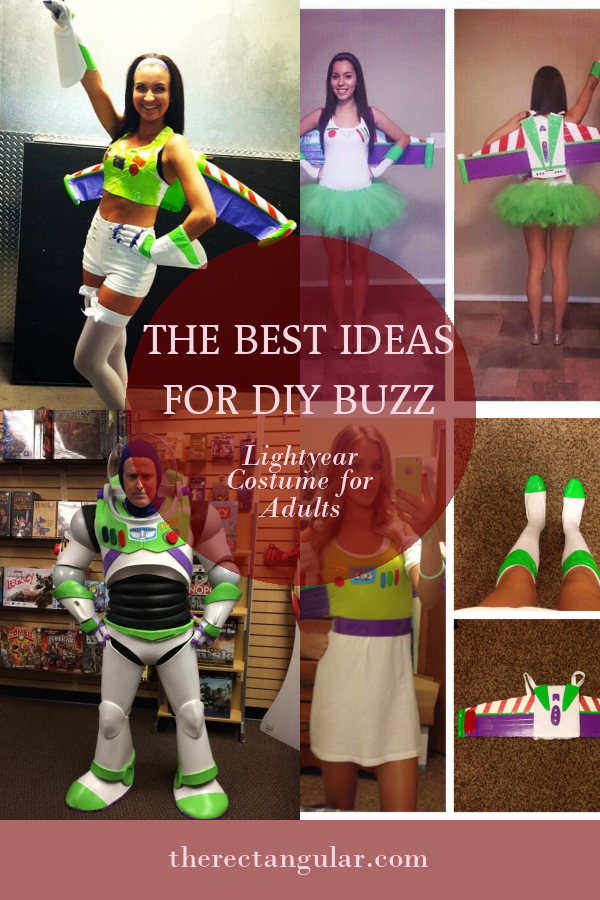
So, you're ready to take on the galaxy with your very own Buzz Lightyear costume? Well, hold your blasters because we’re about to dive deep into the world of DIY costumes! Whether you're crafting for Halloween, a cosplay event, or just because space adventures rock, this guide will have you zapping aliens in no time. Let’s get started, shall we?
There’s nothing quite like the thrill of stepping into the shoes—or should we say boots—of a legendary space ranger. Buzz Lightyear has been an icon ever since his debut in Toy Story, and crafting your own version of his iconic suit is a project that’s equal parts fun and rewarding. But where do you even begin?
Don’t worry, buddy. We’ve got you covered from helmet to boots. In this article, we’ll break down everything you need to know about creating a Buzz Lightyear costume at home. From materials to step-by-step instructions, you’ll be ready to soar through the stars in no time. Now, let’s suit up!
Why DIY a Buzz Lightyear Costume?
Why go DIY when you can just buy a ready-made Buzz Lightyear costume? Well, let me tell ya, there’s something truly special about crafting your own gear. Not only does it save you money, but it also allows you to customize every detail to perfection. Plus, there’s that sense of accomplishment that comes with building something with your own two hands. And hey, it’s way cooler than some generic store-bought costume, right?
Understanding the Buzz Lightyear Look
Before we dive into the nitty-gritty of DIY-ing, it’s important to understand what makes Buzz Lightyear’s costume so iconic. It’s not just about slapping on some silver paint and calling it a day. His suit is packed with details that make him stand out as a space ranger extraordinaire.
Key Features of Buzz Lightyear’s Costume
Here’s a quick rundown of the must-haves for any Buzz Lightyear costume:
- Silver armor with red accents
- A bright green chest plate with the iconic Space Ranger logo
- Black boots and gloves
- A utility belt packed with gadgets
- A helmet with a visor that glows
- A laser blaster because, well, every space ranger needs one
Materials You’ll Need
Now that you’ve got the look down, let’s talk about what you’ll need to bring your Buzz Lightyear costume to life. Gather these materials, and you’ll be ready to start crafting:
- Cardboard or foam board for the armor pieces
- Spray paint (silver, red, green, and black)
- Hot glue gun and glue sticks
- Fabric for the suit (black spandex works great)
- Velcro strips for attaching pieces
- LED lights for the helmet visor
- A small battery pack to power the lights
- A toy laser blaster (or make your own!)
Where to Find These Materials
You can find most of these materials at your local craft store or online. Don’t be afraid to get creative with substitutions if you can’t find exactly what you’re looking for. Remember, the goal is to have fun and make it your own!
Step-by-Step Guide to Making Your Costume
Ready to get started? Here’s a step-by-step guide to creating your Buzz Lightyear costume:
Step 1: Create the Armor Pieces
Using cardboard or foam board, cut out the shapes for the chest plate, shoulder pads, and helmet. Spray paint them silver, then add red and green accents using tape or stencils. Once the paint dries, attach the pieces to your suit using Velcro.
Step 2: Assemble the Suit
For the base of your costume, use black spandex or another stretchy fabric. This will serve as the foundation for all your armor pieces. Sew any necessary seams and make sure it fits comfortably.
Step 3: Add the Helmet
The helmet is arguably the most iconic part of Buzz’s costume. To make yours, use a plain bike helmet as a base. Spray paint it silver, then add a visor using clear plastic and LED lights. Wire the lights to a small battery pack for that glowing effect.
Step 4: Build the Utility Belt
For the utility belt, use a plain leather or fabric belt as a base. Add pouches and gadgets using cardboard or foam. Paint them to match the rest of the costume, then attach them securely to the belt.
Step 5: Craft the Laser Blaster
No Buzz Lightyear costume is complete without a trusty laser blaster. You can either buy a toy blaster and paint it to match, or get creative and build your own using PVC pipes and spray paint. Just make sure it’s safe and doesn’t look too realistic!
Tips for a Perfect Fit
Now that you’ve got all the pieces, it’s time to make sure everything fits just right. Here are a few tips to ensure your costume is both comfortable and stylish:
- Test the fit of each piece before attaching it permanently
- Make adjustments as needed to ensure a snug but not too tight fit
- Use Velcro or elastic bands for easy on and off
- Practice walking and moving in the costume to make sure everything stays in place
Adding Personal Touches
One of the best things about DIY costumes is the ability to add your own personal flair. Here are a few ideas to make your Buzz Lightyear costume unique:
- Add custom decals or stickers to the armor pieces
- Incorporate LED lights in other parts of the suit for extra flair
- Create a custom utility belt with unique gadgets
- Design your own version of the Space Ranger logo
DIY Customizations to Stand Out
Don’t be afraid to think outside the box when it comes to customizations. Maybe you want to add a cape or change up the color scheme. The possibilities are endless, and your creativity is the only limit!
Cost Considerations
DIY costumes can save you a ton of money compared to buying a pre-made costume. However, it’s still important to consider the cost of materials and tools. Here’s a rough estimate of what you might spend:
- Cardboard or foam board: $10-$20
- Spray paint: $15-$30
- Fabric: $20-$40
- LED lights and battery pack: $10-$20
- Total estimated cost: $55-$110
Ways to Save Money
If you’re on a tight budget, there are plenty of ways to save money while still creating an amazing costume. Look for sales at craft stores, use materials you already have at home, or get creative with substitutions.
Common Mistakes to Avoid
Even the best DIYers make mistakes sometimes. Here are a few common pitfalls to watch out for when crafting your Buzz Lightyear costume:
- Not testing the fit of each piece before attaching it
- Using too much glue, which can make the costume stiff and uncomfortable
- Forgetting to add Velcro or elastic bands for easy on and off
- Not allowing enough time for paint to dry completely
How to Fix Mistakes
If you do make a mistake, don’t panic! Most issues can be easily fixed with a little creativity. For example, if a piece doesn’t fit quite right, you can trim it down or add padding. If the paint smudges, just grab a fresh coat and try again.
Final Touches
Once you’ve assembled all the pieces and added your personal touches, it’s time to put the finishing touches on your Buzz Lightyear costume. Here’s how to make sure everything is perfect:
- Do a final fit check to ensure everything fits comfortably
- Test all the lights and gadgets to make sure they work
- Practice walking and moving in the costume
- Take some test photos to see how it looks
Conclusion
And there you have it, folks! Your ultimate guide to creating the perfect Buzz Lightyear costume. Whether you’re a seasoned DIYer or a first-timer, this project is sure to be a blast. Remember, the key is to have fun and make it your own. So grab your materials, put on some tunes, and get crafting!
Don’t forget to share your creations with us in the comments below. We’d love to see how your Buzz Lightyear costume turned out. And if you’re looking for more DIY costume ideas, be sure to check out our other articles. Happy crafting, and may the force of the galaxy be with you!
Table of Contents: